How much is a MVP app?

How much is a MVP app? Well, honestly, that’s a question with a few different answers, and all of them are open-ended.

If your question is in reference to how much of a feature set a MVP app includes, the answer is “all of it,” and you’re wondering about the spend of developing a MVP app, the answer is “it depends.”

MVP apps aren’t magical money-saving inventions, nor do they follow a strict development roadmap – there isn’t a uniform MVP app, just as there’s no set of rules for running a business. A MVP app, by definition, provides the minimum amount of features to be a viable product. So the answer to both of these pre-supposed questions is “as much as you want it to.”

MVPs and feature sets

First off, it’s important to fully define what a MVP is:

Minimum – the minimum set of features a product can have while still remaining…

Viable – to provide value to customers, so they are willing to engage with the…

Product – which is ready to be used for consumption.

Many people like to think MVP means “rushed” or that the product produced could be classified as a prototype. But a MVP app is neither of those things – what makes a MVP app a MVP app is the idea and the implementation of that idea, not the product itself.

MVP apps come with complete feature sets, as they must be ready for consumption on the market – and in fact, MVP apps usually need to perform their specific task better than any other app on the App Store or Google Play.

This is especially true when building a MVP app when competition already exists.

Now, keep in mind, that while a MVP app’s feature set must be complete, there is no such thing as a complete app. Updating your app is a continuous process that is necessary to the success (and survival) of your app. There is a correlation between frequently updating an app, and the revenue that app produces – the most successful apps today release an update one to four times every month.

This is why MVP apps lend themselves well to the app marketplace – software products are expected to update frequently anyway, so you might as well start with a basic, robust foundation that allows for easily planned, strategically implemented updates.

This is the true value a MVP app brings to both you and your users – when presented with a minimal feature set, users are able to request the features they want, and developers are able to implement these user-requested features without the hassle of working around other existent features.

A MVPs feature set should only work to solve the problem the app is designed to solve. Pain points are the most powerful aspect of your app – and any feature that doesn’t play a role in that solution should be removed.

For example, a rideshare app like Uber would only need a few of the features it currently makes use of to solve the transportation pain point it solves. A MVP rideshare app would make use of GPS and mapping, navigation, location services, a backend database to store user data, and a payment gateway like Stripe. This would all be organized in a simple UI.

All of the other features Uber makes use of are quality of life improvements – while they aren’t vital to the core functionality of the app, they do bring users extra value. Adding value to an app over time is a great way to retain users – they will continually return as they see the update notifications.

The cost of MVPs

Due to their reliance on a specific, targeted feature set, the development cost of a MVP app can vary wildly. Depending on what your MVP app is attempting to solve, your app could cost $25,000, or $100,000.

The equation to determine the development cost of any app is the one constant in app development: hourly rate, time, and scale. A MVPs limited feature set – by design – reduces two of these variables. While this does reduce the initial development cost of the app, the true value of a MVP app, as stated above, is the engagement you receive from your users.

This is why the money saved in the development stage should be put right back into building a community for your MVP app. The value a MVP brings is nonexistent if your app doesn’t have a community built around it. As soon as you have an idea for an app on the table, and even before development starts, your first priority should be to find your market, and then engage with it in order to create a community.

For more about MVPs, market research, and pain points, check out our aptly-titled blog, MVP development: Market research and pain points.

The best way to reduce the cost of your MVP app (and this is true for the development of any application, software, or product in general) is to have a solid plan, and carefully execute that plan by properly managing your development cycles.

For more about MVPs and development cycles, check out MVP + Agile methodology.

In-app payments and purchasing – cost and profitability

There are many methods of app monetization, but none are as palatable for users – and profitable for publishers – as in-app payments and in-app purchasing. Just like any lucrative revenue stream, however, there are many costs (both hidden and upfront) associated with implementing the ability to charge users while they are engaging with your app; and there are even more pitfalls that may pop up during the development and implementation of in-app purchasing and payments.

Below, you’ll find knowledge about the deployment, cost, and revenue potential of in-app payments and purchasing:

The difference between in-app purchases and in-app payments

There’s a lot of different ways for users to spend money in apps, and a plethora of platforms that facilitate payments. In-app purchases are distinguishable from in-app payments because they are used in situations where the user isn’t buying a product, but rather additional content for the app itself.

In-app payments refer to purchases made through an app – the most common example being eCommerce apps, or even retail apps like those for Target or Kroger. Both of these methods involve the user paying for a good or service – but both are implemented (technologically, and strategically) using different methods, and come with different associated costs, as well as revenue models.

Let’s look deeper into these two revenue-driving options:

In-app purchases

In-app purchases can be broken down into four categories:

  1. Consumables: These are (usually) single pieces of content that are purchased once, depleted, and then purchased again. The most obvious example of a consumable purchase in an app would be lives, gems, or coins that many mobile games use as in-game currency. Another example of consumable purchases that is outside of the gaming sphere, however, is Tinder’s option to buy more swipes. Consumable purchases don’t just belong in games – if your consumable purchase can provide enough value, users will purchase it.
  2. Non-Consumable: These are, not surprisingly, the direct opposite of consumable purchases. Once bought, these extra pieces of content, additional features, or extra services will never expire. A good example are filters in Instagram, or sticker packets in WhatsApp.
  3. Auto-Renewing Subscriptions: Using this model of in-app purchasing, users buy access to services that regularly provide content updates, like Hulu. Other subscription services offer more utilitarian products, like cloud storage services such as dropbox, or productivity software like Monday. Users will be charged on a regular basis using this model.
  4. Non-Renewing Subscriptions: Users will purchase access to services or content just like auto-renewing subscriptions – this method differs in one key factor however: content is not regularly updated, and the user is only charged once for the content or service, and not on a reoccurring basis. The most prevalent example of this would be the omni-present “season pass.” In order to access these services or content, users must pay for every release.

Note: For apps published to Apple’s App Store to make use of in-app purchasing (and payments), publishers must sign Apple’s Paid Applications Agreement, as well as set up their company’s baking and tax information with Apple.

There are two options when it comes to in-app purchasing APIs: StoreKit for iOS, and In-App Billing API for Android (always with the clever names, Android). These options are the only two available for implementing in-app purchasing through Apple and Google’s platforms, and both (just like the sale of any product or content through the App Store or Google Play) will take 30% of the profit from each in-app sale made through your app.

This form of app monetization is, so far, incredibly successful, if implemented respectfully and properly. According to a study conducted by App Annie, out of 1,200 developers, 50% of them used in-app purchases to drive their revenue, and the App Store’s top revenue-earning app of 2018, the game Fortnite, made $450 million that year – using a revenue model mainly based around in-app purchases of character costumes.

In-app payments

This is where your field of developmental and payment options begin to widen – the purchasing of goods, services, and content outside of the App Store or Google Play can be implemented through many different APIs, and the strategy behind the CTA changes based on the individual app.

On of the most popular apps to make use of in-app payments is Uber – riders need a way to pay drivers, and drivers need a way to receive payments. In the same manner as Apple and Android with in-app purchases, Uber takes a percentage of the profits from each transaction between riders and drivers.

This revenue model is also highly successful – Uber’s revenue in 2018 was $11.27 billion.

In-app payments are also the backbone of mobile eCommerce – an industry that boasted 500 billion individual sales in 2018.

While you can develop your own custom in-app payment processing system, there are APIs out there that can speed up development: two popular options being Stripe and Braintree. Both of these APIs provide end-to-end encryption, and charge a percentage for each credit or debit card transaction. Stripe charges 2.9% + $0.20 for non-European cards, and Braintree charges 2.9% + $0.20 as well.

In the near future, we’ll cover these (and more) in-app payment APIs in greater detail – so stay tuned for a deep dive into payment gateway APIs.

When implemented, and not imposed, in-app purchasing and payments are an un-stoppable revenue stream

The key to both in-app purchases and payments is to be honest, clear, and provide value. Remember – anyone can play Fortnite for free, and yet it made $450 million last year. While the in-app purchases in the form of costumes weren’t necessary to the gameplay, users were more than happy to purchase them. When users don’t feel pressured to pay for extra content or services, but are rather presented with the option, they are more likely to pay, and continue engaging with your app.

Reported from Clutch – NS804 Apps’ client rating is 4.9 out of 5 stars

At NS804, our team of motivated engineers provides full-service mobile application development, specializing in native iOS and Android mobile app development. Since 2012, NS804 has produced more than 100 apps.

As a result of our dedicated service to customer satisfaction, partnerships, personalized digital strategy, and informed design, NS804 has earned a reputation for our tailor-made developments, according to Clutch.

Through Clutch, our clients have rated us a 4.9 out of 5 based on their experiences with us from their app development’s start to completion. Our firm, based in Virginia, strives to be your partner and your developer – when you succeed, we succeed – so your success is always our number one priority. Your input and vision for the app we help bring to life is highly valued by our team, as we aim to ensure that you understand the front and backend processes of your app.

Clutch, a respected Washington D.C. B2B business, ratings and reviews platform that provides firm suggestions and buying recommendations to a plethora of businesses through its ranking system based on collected objective client feedback, seeks to ensure that the best value is given through their in-depth analysis of this data.

Our past clients only have good things to say about their experiences with NS804, highlighting our responsive communication, pride in our work, guidance from start to launch, and a lot more.

In one of our most recent reviews, the founder of Carpe Diem Social LLC said, “[NS804’s] team does a great job of turning around last-minute requests,” showing our dedication to our clients and willingness to accommodate you however we can.

It’s feedback such as this that means the world to us – if there’s anything we can do to help our partners succeed, we’re on it.

Clutch Profile

The Manifest, a sister blog site of Clutch, featured our team in Richmond as a top 2 app developer in Virginia. We can help your business be one of the 32% of small businesses have a mobile app.

So what are you waiting for? Come create with us today. Contact us here.

Backend design

When I was younger – as in less-than-a-decade old – I wanted to be an architect. That was, until I learned about the existence of trigonometry, calculus, and all the higher-than-geometry level math I could never possibly hope to understand. I liked drawing houses and castles, not mathematically planning them.

Many professions, just like that of architect, necessitate the mastery of hidden skillsets or knowledge bases that the layperson isn’t aware of; the perfect example of this being backend developers. The title, and the topic that comes with it, is enough to make most people instantly glaze over – even some frontend developers will look for an excuse to escape from the conversation.

There’s a reason that this blog is titled “backend design,” however – a lot more design goes into backend development than you would think. Or, more accurately stated, a lot of design goes into architecting the backend.

Systems architecture

According to Introduction to Systems Architecture Design by Medium, backend architecture is “… a conceptual representation of the components and subcomponents that reflects the behavior of the system.”

In other words, backend design is architecting a structure for the frontend, user-facing data layer. It’s akin to designing a car – there’s just as much artistry necessary as engineering. Code is code is code – there’s nothing special about Ruby on Rails or Node.js. Once mastered, the language of the backend can be written just as fast as a frontend developer working in Swift or JavaScript.

Just as a good UI designer knows how to create a rectangle in Sketch, so to does a backend developer know how to build a NoSQL database: the true skill of design is knowing where to place that rectangle in order to create a pleasing layout, or how to organize data in order to minimize latency.

So know that when someone starts talking about systems architecture, they’re really talking about architecture, and less about code. And once this topic is broken down, it’s not that complicated (on a high-level, at least) to comprehend.

The backend can be broken down into three layers:

  1. Controllers – these handle client requests, such as when a user adds an item to their cart.
  2. Services – access data in the DAO layer, and send it back to the controller, which then sends the retrieved information to the client.
  3. Data Access Objects (DAO) – This is the layer where data can be stored, organized, and accessed.

Most often, these layers can be implemented by cloud providers; these platforms – like Amazon Web Services, Google Cloud Platform, or Microsoft Azure – will sell managed services like on-demand servers, or databases (in addition to many other services).

When someone speaks to the scalability of the cloud, this is what they’re referring to; “the cloud” is really a collection of remote servers that provide customers with ready-made backend infrastructure, giving companies the ability to increase their operations without needing to store, manage, and maintain servers physically on site.

Within these layers are components, of which we’ll cover the four most basic and widely-used:

  1. Virtual machines – Like most things in the world of computers, the moniker “virtual machine” is an apt descriptor of what VMs do; a VM is nothing but a computer simulated inside of a computer, much like a digital Russian nesting doll. When utilizing cloud providers, VMs will be hosted on larger servers that allocate the necessary CPU, RAM, SSD, and network bandwidth in order to run your VM – this exact process can be achieved on a personal computer as well. VMs run the operations of your backend.
  2. Load balancers – Run too many applications on your computer, and it’ll start to slow down. The same is true for your VMs in the cloud or on your local servers – too many client requests, and the time it takes to load a page can skyrocket. Your backend’s load balancer is designed to solve this problem: load balancers act as a medium between your backend’s controllers and services layer. Load balancers both interpret client requests from the controllers layer, and keep track of the health of VMs – and to ensure low latency client request, the load balancer distributes those client requests evenly between VMs.
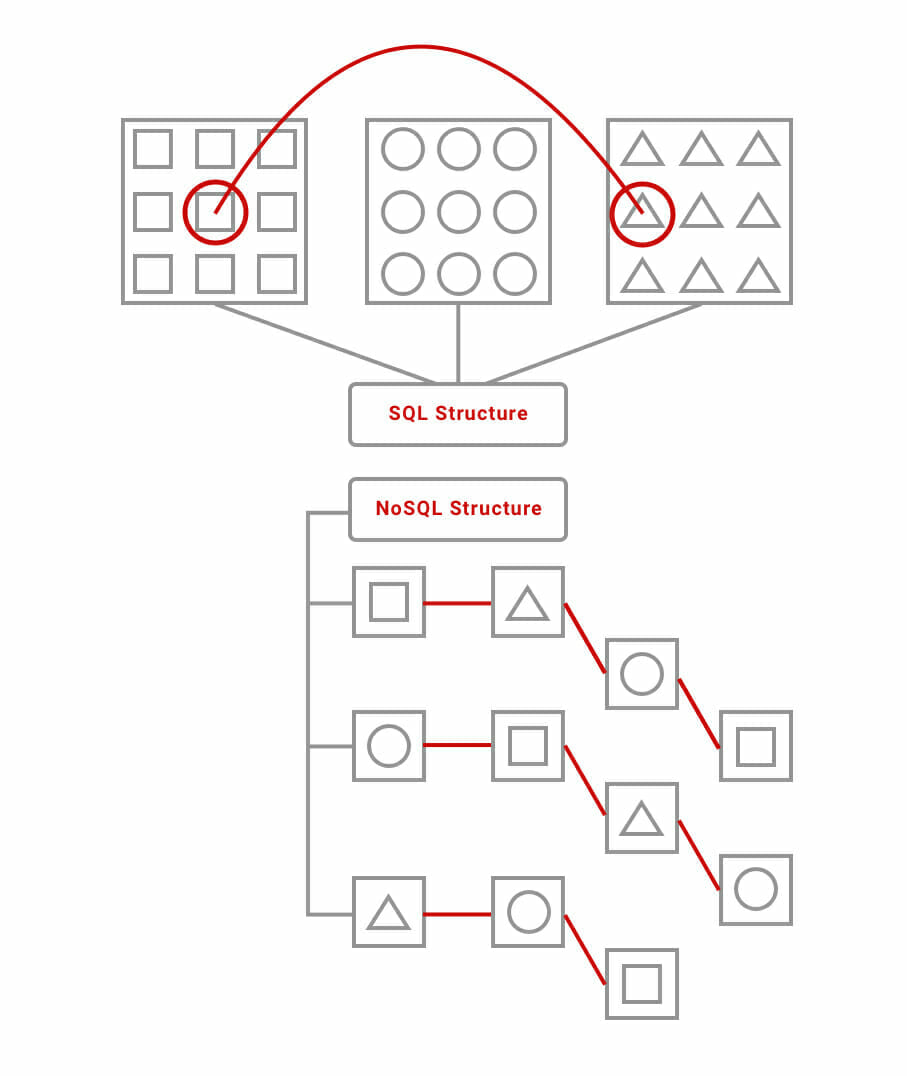
  3. Databases – Databases are how your DAO layer is organized. There are two types of database structures: non relational (NoSQL), or relational (SQL). We’ll cover those a little bit below.
  4. Caches – The reason databases can have different structures is because certain databases are optimized for different types of data, in order to decrease the time it takes to access information. Caches are used for the same reason; during times of heavy traffic, caches can store data that is sure to be accessed in rapid succession by many clients, thus reducing the time it takes to complete client requests. Caches can be thought of as super-optimized, small databases.

Back it up

Before we get into anything more complicated, theres a few basic concepts we can go over now that we’ve covered the building blocks of the backend:

  1. Latency – This is the length of time it takes a client request to complete. Latency always refers to time.
  2. Bandwidth – This is the maximum amount of client requests (data) your server can handle.
  3. Throughput – This is the true amount of data your servers can handle. Often, during times of high traffic, bandwidth will drop as latency rises – this new measurement is called throughput.

In order to reduce latency and increase bandwidth, backend systems will be scaled up to process more client requests. This can be achieved via three different methods:

  1. Vertical scaling – This method reduces latency by increasing the amount of requests a single VM or physical server can handle by upgrading the CPU, RAM, or SSD of the machine.
  2. Horizontal scaling – Reduces latency by adding more VMs or physical servers, thereby increasing the number of client requests that can be handled at a given moment.
  3. Auto scaling – uses the same principle as horizontal scaling, but automates the process: VMs are added as they are needed, and deleted as client requests decrease. Both auto and horizontal scaling necessitate a load balancer.

Another design choice that can reduce latency is the type of database your DAO layer makes use of. As stated above, there are two types of database structures: SQL and NoSQL. While SQL databases are organized to write data in a very efficient manner; NoSQL databases are organized to read data quickly, but due to their structure, require duplicate data in order to access information.

You can think of a SQL database as a collection of tables that hold very specific, uniform sets of information, that link up in a web. NoSQL databases are structured in branches, which lead to other branches, which lead to other branches.

SQL - NoSQL

Both come with their pros and cons – NoSQL databases can access information faster, and are optimized for dealing with un-related sets of data. SQL databases are robust and optimized for dealing with requests that require relational data from various processes in your backend’s service layer.

Back in business

Just as a house would fall apart without the wooden structure, plumbing, wiring, and ventilation, so to would your website or application without its backend. It’s important to know what’s going on back there!

Stay tuned for our future look into scaling up your backend systems.

How much does it cost to make an app like WhatsApp?

An app such as WhatsApp is similar to an iceberg: there’s a lot more going on under the surface than above. Like many of the apps we have covered in our How much does it cost? series, WhatsApp’s seemingly simplistic design and easy-to-navigate functionality disguise its internal complexity. Every app’s development cost comes down to the following equation: Feature set + scale + hourly rate = total development cost.

Using this equation, we can determine that based on the scale of the app being created, the cost of developing an app with a feature set similar to that of WhatsApp would range from $75,000 to $95,000. These are, of course, the ranges of your app’s initial development cost – you can expect to spend one-fifth of your app’s total development cost in app maintenance every year. Also, different hourly rates can increase or decrease your overall spend drastically.

It’s important to note that no app is the same – and until you have your app’s entire feature set planned out, it’s backend systems architected, and your market research complete, you won’t be able to accurately assess the true cost of your app’s development. The estimates below are just that – estimates. While these ranges do come with the backing of years of professional experience and know-how, development of any app’s feature set can vary wildly depending on many factors.

WhatsApp’s market presence

WhatsApp was founded all the way back in 2009, and five years later, in 2014, was sold to Facebook for $19 billion. To put that return-on-investment into perspective, their initial app was developed with $250,000 in seed money.

WhatsApp didn’t just experience record growth in the company’s valuation – in just four years time, the app had seen its monthly user metric rise to 419 million – that’s more monthly users than Facebook Messenger, Gmail, Twitter, and Skype’s fourth year monthly numbers combined.

Now, in 2019, WhatsApp’s monthly user number rests at 1.5 billion. That’s a lot of messages.

Let’s look into the feature set that created the environment for such a wildly successful app:

WhatsApp’s feature set

UI / Design / Animation

There’s a pattern in UI/UX design that’s so constant it could be called a rule: the simpler an interface is, the more time and thought was spent designing it. Taking the entirety of WhatsApp’s feature set and creating an easy-to-use interface takes time, resources, and plenty of experience. Designing an app that uses the number of features that are present in WhatsApp would cost at least $10,000, but this cost can vary depending on the functionality you want your app to possess.

Instant messaging

This is the main feature of WhatsApp – for many of the app’s users, the instant message feature either replaced or beat SMS to the punch – and this is made especially recognizable by the app’s large number of international users.

All messages (and indeed, all forms of communication) sent through the app are free – users only need to provide WhatsApp with a phone number that is used to create a unique profile, and they are able to instant message with any WhatsApp user for no charge.

WhatsApp sends messages over a wifi connection using end-to-end encryption – if a user is not connected to the internet when a message is sent to them, the message will be stored temporarily on WhatsApp’s servers, until the user has established a connection again. Once a wifi connection has been re-established, the message is downloaded to the phone. After a message has been sent and received between the parties communicating, it is deleted from the WhatsApp servers.

WhatsApp’s instant messaging feature can be used to send messages to an individual WhatsApp account, or to a group – of which you can add a maximum of 256 users to a single group. The technology behind WhatsApp’s instant messages is called XMPP (extensible messaging and presence protocol).

Developing these combined features for your app would cost at least $35,000.

VoIP and video chatting

WhatsApp users can also make phone and video calls through the app – by using voice over internet protocol technology. By using internet and cell data, users can talk and see each other anywhere around the world without paying for international charges.

Developing your VoIP features for your app would cost at least $35,000.

Geolocation

Using the “Live Location” feature, users can share their location in real time with contacts. They can control their privacy by manually turning this on and off, or by setting a share timeframe. If your app will be developed for Android, it’s best to use the Google Play location services API, and if your app is intended for iOS, Apple’s Core Location Framework.

Implementing a feature such as this will cost around $3,000.

Push notifications

Users will receive push notifications whenever they are sent a message while they are not currently engaged with the app. There are many different methods of implementing push notifications, whether through cloud integration, AWS, or may other platforms. Our favorite is Kumulos.

Other features

WhatsApp makes use of other features to round out its feature set: cloud integration so users can save messages, calendar sync so users can easily schedule meetings and appointments, multi-media file transfers so users can share content with each other, and in-app payments so users can send money to one another.

WhatsApp?

If you were to build from scratch an app that mirrors WhatsApps’ current functionality, your development time would range from 650-750 hours. This can change depending on many different factors, including the development team, the feature set, and the specific requirements for features such as security and latency. The time spent developing an app such as this is worth it however – and all 1.5 billion WhatsApp users agree.

How to find a pain point for your app – discovering the value you can bring to customers

All inventions and products – from the wheel to selfie-sticks – are designed to solve a pain point. There wouldn’t be the need of inventing something if there wasn’t a problem to begin with – and good thing too; if early homo sapiens had no need for fire, we wouldn’t be where we are today.

Inventions, and the products that follow, make things easier. A product only has value when it helps the customer – if it creates no change (or, even worse, negative change), the product is useless. The only way to ensure a product is truly useful for customers is for that product to solve a pain point they face – whether in their daily, weekly, monthly, or sometimes, even yearly lives.

A pain point is difficult to identify, and requires discerning the true nature and scope of the problem consumers are facing. Pain points may present themselves in a few different ways:

  • By being confronted with the pain point in your own life
  • Your own ideation
  • Exploratory market research

Each of these three come with their own methods for finding a pain point – let’s go over them:

Experience it

This is the most common form of pain point discovery – after confronting a pain point in your life enough times, you’ll either come up with your own solution, or find someone who can help to provide the solution. Everyone may be a unique individual, but we all share struggles throughout our day; chances are, if you’re facing a personal pain point, other people are as well.

This method of pain point identification is the most straightforward in addition to being the most common – usually, the solution will present itself to you in a moment of clarity – many dreamed of stronger backs, but someone creative enough dreamed of the wheel.

Often, there is little-to-no need to explain the solution to customers when your pain point’s genesis is one such as this; merely introducing users to your product or idea will be enough to generate conversions.

Your idea needn’t be nascent either – your pain point might stem from another company’s product. If you are able to provide a simpler or more effective solution to the pain point than the original product, your product has a very good chance of success. This is for a few reasons: there is an already proven need, the market is already identified, and product expectations have already been set.

With the introduction of even just a slightly more efficient experience, your product can grab hold of a significant portion of the market, in the same manner as Lyft did with Uber.

Create a need

Pain point creation is a topic that could easily fill a book. The idea of creating a pain point is the direct opposite of the previous method – rather than being presented with a pain point and then solving it after experiencing it, it revolves around making a product that simultaneously creates and solves a pain point.

Sound complicated? The theory is complex, but the implementation of this method creates the most common form of product on the market – those we don’t need. Perhaps the most proliferate example of such a product are collectibles in competitive gaming:

Don’t have a pink cowboy hat? Well, now your space marine can – for just $1.99!M

Or, to bring it out of the digital realm:

Got milk?

Regardless, creating a pain point takes a lot of market research, which is exactly what we’re going over next.

Find a community

This is always made easier if your market research is looking into an already existing market – think Coke vs. Pepsi, or Windows vs. Mac. If you’re searching for an untapped market, however, this process can become much more complicated.

There’s often a need to find a new community to market to when you offer a service in an over-saturated market, and are looking for a new growth opportunity, or searching for a concrete customer base.

For example, there are plenty of custom carpentry shops – some specialize in cabinets, others in furniture, and others in flooring – but all of these markets are awash with carpentry companies competing for customers.

Carpentry companies like Wyrmwood (a company that makes wooden table-top gaming accessories for games like Dungeons & Dragons) however, can utilize many of the same carpentry skills while catering to an untapped market – meaning their re-tooling and operational costs hardly change, and their potential profit grows exponentially.

This isn’t to say that the people at Wyrmwood don’t enjoy D&D – it’s that they were smart enough to see a need, and fill the void in that particular market.

The most sure method of finding a community with a need is to search for one that is engaged. It helps to find a community that is obscure enough to not have a competitive market as well, but that isn’t always a possibility.

When you find a community that is truly engaged, go to important events based around that community, visit the online homes of the community, and engage with it yourself. After engaging with members of this newfound community, you’ll have either found a pain point through your research, or experienced the pain point yourself.

Your community needn’t be close knit either – entire demographics can fill the same role. For one of our client’s apps, this was the method of pain point discovery; Lauren Bell’s Whystle found that families (and the federal government and private brands as well) wanted to have an informational hub for product and safety recalls – Lauren Bell was inventive enough to think of putting it on an app.

After finding your pain point, what’s the next step? Find out here.

How much does it cost to make an app like tinder?

Building a dating app like Tinder is much the same as building a relationship – it takes time (which in the case of mobile app development, means money) to develop something special. If you’ve been keeping up with our How much does it cost? series, you’ll be familiar with the app development cost equation: Feature set + scale + hourly rate = total development cost.

Using this equation, we can determine that based on the scale of the app being created, the cost of developing an app with a feature set similar to that of Tinder would range from $80,000 to $150,000. These are, of course, the ranges of your app’s initial development cost – you can expect to spend one-fifth of your app’s total development cost in app maintenance every year.

It’s important to note that no app is the same – and until you have your app’s entire feature set planned out, it’s backend systems architected, and your market research complete, you won’t be able to accurately assess the true cost of your app’s development. The estimates below are just that – estimates. While these ranges do come with the backing of years of professional experience and know-how, development of any app’s feature set can vary wildly depending on many factors.

Let’s look over Tinder’s feature set, and go over the individual aspects that influence a dating app’s cost of development:

Tinder’s feature set

UI / Design / Animation

For every screen an app has, and for every point of interaction on those screens, more time will be spent designing and animating your app. Animation is a key factor to user retention in any app, but when designing an experience meant to entice users, animation is a necessity.

Depending on the number of features your app utilizes, your UI/UX costs could range anywhere from $6000 to $15,000. If your app is being developed for both iOS and Android, this time will be nearly doubled (this is applicable to most app features).

Social login integration

A quick onboarding process is another important development choice when it comes to maximizing your app’s user retention. The less steps a user needs to take before they are able to use your app, the better. This is where social login integration comes into play.

Tinder connects a user to their Facebook profile, and then creates unique credentials for that user, which can then be used by the user to login to Tinder. While the user is still effective logging in via Facebook, Tinder creates a unique tag based on the user’s Facebook profile to increase its security. Implementation of this feature can cost anywhere from $300 to $1,500, depending on the level of security you want in place.

Instant messaging

Tinder’s chat feature can be replicated via a messaging service like Pubnub or Apache Kafka.

PubNub can provide real-time integration for chat features, IoT device communication and streaming, mapping, GPS, push notifications, and alerts. PubNub’s services start at $49 per month, plus data transaction fees.

Kafka can be used for messaging, website activity tracking, log aggregation, stream processing, and event sourcing. Like everything under the Apache license, it’s open source, and therefore a free API to implement.

There are many more real-time services that provide real-time chat functionality, like AWS and Google Firebase. For more about realtime implementation, check out our How much does it cost to implement realtime updates in your app? blog.

Facebook data integration

After using the Facebook login feature, Tinder will mine for specific data from a user’s Facebook profile – examples being mutual friends and common interests, as well as location. Tinder then takes this collected data and uses it to help find potential matches for the user.

Implementing a feature such as this can range from $10,000 to $13,500, depending on how much information you want your app to collect.

User profile

In order to keep track of who a user has matched with, potentially matched, rejected, and been rejected by, Tinder must store data tied to individual user profiles. This data would be collected and stored in the backend in data tables located in remote servers.

When users add a profile photo, edit their bio, or make any change to their profile, the app will re-write the data stored on the server. Anytime a user views another user’s profile, they are connecting to the server that houses the respective data.

Implementing a feature like this can take 120 to 200 hours of development time – building out the data layers necessary for an app like Tinder is a massive undertaking. Also, be aware -managing a growing user base over time can significantly increase your backend server maintenance costs.

Matching

We all know how the process of using Tinder works; if a user swipes right on another user’s photo, and then that user swipes right on the other user’s photo, a match is created, and the users can then begin chatting through the app.

While this creates an easily understandable flow for the user, there is a significant amount of real-time data transferring that must take place in order for this feature to be properly implemented.

Development of this feature can cost anywhere between $1,500 to $3,000 to implement.

Notifications

Notifications are one of the most effective forms of engaging users when they aren’t directly using your app. They are also incredibly practical calls to action – if a Tinder user gets a match, they can be alerted via a push notification alerting them as such. Or, if a user has ran out of swipes for the month, but has a high number of potential matches, you can entice the user to buy more swipes so they can connect with the users who have expressed interest in their profile.

For more about implementing push notifications, check out our blog How much does it cost to implement push notifications? – with Kumulos.

Location services

Tinder automatically detects a users location, and provides potential matches based on that location. Tinder also gives users the ability to pin their location to a specific area, and to change their location entirely.

Implementing this feature would range from three to five hours of development time, but this estimate can change depending on the complexity of the system you are creating, and the SDK you are utilizing.

For more information, check out our blog, How much does it cost to add a GPS and mapping API?

In-app purchasing

Tinder uses in-app purchasing to increase its revenue – from paid subscriptions to emoji packages, users can make purchases through the app. In order to implement in-app purchasing, you can use a payment API like Stripe.

Proper integration of this feature can range anywhere between $4,000 and $5,000.

Tinder’s revenue

Tinder’s revenue stream is massive – in 2018, the app made $800 million. The app sees about 50 million users per month, has 3.8 million paying subscribers, generates almost 26 million matches every day, and users swipe over 1.6 billion times every 24 hours.

While developing and maintaining a dating app like Tinder might have a fairly high initial development cost, the potential revenue your app can generate more than makes up for it. For more about app maintenance costs, visit our blog, How much does it cost to update an app?

Why MVP for your mobile app?

Why do so many software products start out as MVPs?

The reason is due to the significant benefits MVP software brings to the development process: faster, more affordable development, and reliable, resourceful market validation. Essentially, a MVP is a quick method of validating your product via customer feedback. But before we get any further, let’s go over what “MVP” actually means.

MVP stands for:

Minimum – the minimum set of features a product can have while still remaining…

Viable – to provide value to customers, so they are willing to engage with the…

Product – which is ready to be used for consumption.

The development of technological products has always lent itself to that of a MVP – from Alexander Graham Bell’s telephone to the 1998 startup named Google, MVPs have had a huge impact on the way users and products co-exist and co-benefit from each other.

Well-known MVPs

It wouldn’t be fair to say that the following products should still be considered MVPs presently – but rather that they started out that way, and over many iterations, have become the products, services, and platforms they are now.

Facebook

Back when this social media giant was known as The Facebook in 2004, the product offered was most definitely a MVP. During its 1.0 phase, Facebook was a website available only to Harvard students – the intention behind this limited release was to collect feedback in order to create a more robust and user-friendly product. At this time, Facebook was nowhere near what it is today – the website comprised of a profile page, friend requests, and a “send message” feature.

AirBnB

The story of this internationally-used app is the perfect example of a successful MVP product. An idea thought up in 2007 when roommates Brian Chesky and Joe Gebbia were unable to afford rent in the expensive real estate market of San Francisco, the app now known as Airbnb was originally a website by the name of airbedandbreakfast.com.

The site’s first listing (Chesky and Gebbia’s apartment living room) was a true MVP experience as well: an air mattress in a room, along with a cooked breakfast. These are the amenities users of the original site were offered. After the addition of Nathan Blecharczyk (the creator of the website) and the Industrial Design Conference of 2008 held in San Francisco created a need for extra lodging in the area, the company was able to host its first guest.

Now, the company is considering the possibility of opening its own airline. This is the power of MVP products; they can start out as a single air mattress in your apartment’s living room, and develop into international companies with revenues measured by billions of dollars.

There are many more MVP success stories, like that of Goupon, Amazon, Buffer, Snapchat, and others – but for now, let’s get into what makes a product a true MVP.

MVP theory

As previously stated above, a MVP is a product that provides users with the minimum set of features required to provide a marketable and consumable experience. When Bell invented the telephone in 1876, his product provided a usable method of long-distance communication, and not much else. His original telephone model required users to speak into a standing receiver, and hold another speaker to their ear – and after decades of feedback from customers, phones morphed from rotary, to corded and cordless, and eventually to cell and smartphones.

It is this evolution that is the hallmark of a MVP.

While MVPs do come with quicker development cycles (making it easier to beat competition to market, as well as capitalizing on untapped markets), the most beneficial aspect of a MVP is the direct customer validation.

The market (and your users) will very quickly determine if your product is viable. If the idea is interesting enough, or the solution to the pain point is useful enough, users will jump on board. Therefore, by the usage of a MVP, you can quickly and cheaply prove your validity on the market without wasting time and resources on preliminary marketing and focus groups.

The next step is the most important – listening and reacting to customer feedback. The idea behind a MVP isn’t to build a product with the minimal feature set and then leave it alone – AirBnb didn’t stop at a single air mattress, after all – it’s to create the foundation for a fully-fledged product, platform, or experience.

Take the feedback you receive from early adopters, and implement it – this creates a strong brand for two very important and distinct reasons: your company proves to customers that their voices are heard and matter, and customer-requested features ensure a UX that has been tested against multiple scenarios, environments, and use cases (and lacks any excess features your users don’t want).

MVPs prove your worth

With market validation comes revenue – which can then be used to present a case for your business to investors. After AirBnB’s debut in 2008, the company received their first round of seed money in 2009 from Y Combinator, and by 2010, had raised over $7 million. By 2014, the company was valued at $10 billion, and now, in 2019, boasts a valuation of $35 billion.

MVPs naturally lend themselves to the continual update cycles apps (and all software) are beholden to, and create an environment for meaningful, impactful improvements to your users’ experience. MVPs are more than just a quick way to develop an app – they provide you with the foundation to create a community based around your brand.

The language of app design

What message is your app’s design communicating to your users? Visual design (and UI design in this case specifically) has a language unto itself, and like it or not, your app’s users are reading between the lines.

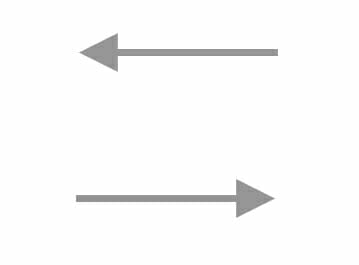
Visual design is based upon universal principles easily understood by everyone. For example, below, you’ll see two arrows – one pointing left, and one pointing right (or starboard and port, if that floats your boat):

Now, which one is pointing forwards, and which one is pointing backwards?

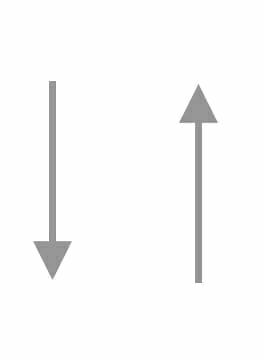
Or, if we were to flip this idea on its side; based on the two arrows below, which is pointing north, and which is pointing south?

Almost instinctually, your brain knew the answers. You might have even made those visual associations before the questions were posed. These associations come from the language of visual design – taking a left turn in a car doesn’t necessarily mean you’re going backwards, just as walking up a staircase doesn’t mean you’re headed in a northernly direction – our brains only associate an arrow pointing left with the meaning of “backwards” in certain contexts.

This is why you don’t need to be a professional UI/UX designer to understand when an app “feels” wrong – our brains are trained to take in visual information in certain patterns, using standard hierarchies.

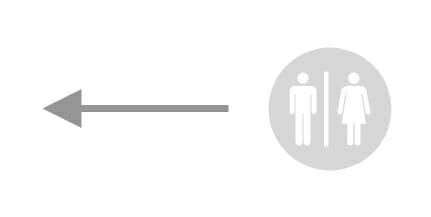
Take, for example, what happens when the same left arrow is placed next to the universal sign for “bathroom.”

All of a sudden, there’s no way this arrow means “backwards.” Visual design is precise, and the patterns our brains are trained to recognize mean something. If the design of your app isn’t getting the message across to your users, you’re severely shortchanging yourself, and your app’s chance at success.

Platform design principles

Just because there’s a universal language of design doesn’t mean everything looks the same (thank goodness). Both Apple and Google have their own design principles and schools of thought – those being the Human Interface Guidelines, and Material Design, respectively.

While these OS specific UI design guidelines do cover the more detailed aspects of design, such as typefaces and font use cases (those being San Francisco for iOS, and Roboto for Android), they mainly cover high-level design choices like those of hierarchy of information, menu placement and organization, and text alignment.

This is the reason it’s important to remain cognizant of which platform you are designing for, and why it’s bad practice to simply copy and past the design of an app when developing for both Android and iOS.

For example, iOS users will be familiar with the top menu on the left, and Android users will similarly find the top menu on the right to be familiar:

(Image from this blog by Cory McArthur)

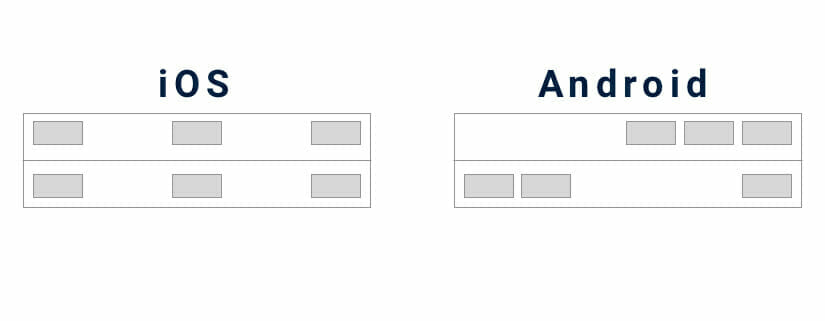
If we were to simplify these design to their wireframe layouts, they would appear as such:

While both present network information, time, and battery usage at the top of this menu, they are located in different positions – both are easily understood, but use different design styles – iOS being making use of center-justified design, and Android left/right justification.

These design styles are made with the intention of being easy to understand – and while they both are, users come to learn and prefer the feel of either Human Interface or Material Design as they interact with either iOS or Android.

Design and user retention

There’s the old adage, “don’t judge a book by its cover.” A saying such as this rings true because the cover doesn’t actually detract from the user’s experience while engaging with the book – the cover is the least-looked-at part of a book while being used.

The direct opposite is true of apps – a poorly-designed app will provide a subpar user experience. An app that suffers from poor design will be difficult to comprehend; and as such, the book’s equivalent of bad UX would be a novel printed with yellow ink on white pages.

According to this blog from Medium, a study conducted in Canada found that a poorly-designed platform actually makes accomplishing the task it was designed to complete more difficult than when compared to a well-designed platform.

It largely comes down to user psychology – a more pleasant experience puts the user into a better mood, which creates a more engaging experience for the user, which means they pay more attention to the app’s flow, which then improves their knowledge retention, which leads them to feel familiar with the app.

Before long, positive feelings are associated with the app – while this is largely dependent on the solution to the pain point the app provides, the experience of arriving at that solution can either be enhanced or tarnished by the UI of an app.

According to this user retention guide from CleverTap, the most important goal of user retention is to “create an immediate, immersive encounter with the app’s unique value.”

In order to do that, you’ll need to create a well-designed UI, so users feel drawn into the experience of your app. No one wants to look at an ugly app for long.

An overview of UI design

UI can be broken down into a few categories when it comes to the interactive design elements UI is created from: navigation, menus, and buttons. Graphics, despite adding significant value to an app’s UI, aren’t truly part of the interactive aspect of an app, other than symbols or icons that may be selected in a menu, such as a “home” button or “shopping cart” button.

Navigation

  • Gestures: Gestures such as swiping or pinching provide tactile methods for users to navigate through, or engage with apps.
  • Screen transitions: Either modal (coming in from the bottom), or push (coming in from the side), screen transitions can simplicity explain if a user has moved on to the next step (push), or entered a sub-step (modal).

Menus

  • Bottom navigation bar: Mainly found in iOS app design, the bottom navigation bar provides an area that showcases all of the app’s navigation options to a user; for example, home, order, review, profile, and much more. Each icon will lead to a different screen, which can then be engaged with to progress through the flow of the app.
  • Hamburger menu: Mainly found in Android apps, the hamburger menu is named as such because it is denoted by a button with three horizontal lines stacked vertically over one another, creating a “hamburger.” This menu will usually expand from the button after being pressed, and is often a push transition.
  • Alerts: Alerts function as small menus, and will often “pop up” when the user has input an action the app must verify. For example, if a user were to clear their cart before completing an order, an alert would pop up, asking if the user indeed intended to clear out their cart, with the option of either pressing “yes” or “no.”

Buttons

There are many types of buttons, but as their name implies, they all require the user the press them in order to function. Some common buttons found throughout app design are: share, add, switches, pickers, and checkboxes.

Next month, we’ll release a complete glossary of UI design terms for you – but if you’d like to continue learning about app design, check out our blogs, Five mobile app design ideas, and Top app design practices – 2019.

Custom inventory solutions for the enterprise level business

There are many inventory management solutions out there, but many are ill-suited to the reality of enterprise level environments that currently exist on legacy systems, or lack the ability to integrate with entrenched ITSM using languages like .NET.

For these reasons, and more (which we will cover below), a third party proprietary inventory management software system won’t make the cut when stacked up against the vast scale and needs of the enterprise level.

The scope of inventory management

Inventory management software can either be used as a standalone system, or integrated within your ERP. A basic inventory management system would provide tools used for:

  • Tracking products
  • Alerting when product levels are low
  • Barcode scanning
  • Generating accurate accounting and financial data

There are many free inventory management software platforms that will offer most of the features listed above, but few include barcode scanning, and many lack reports that can integrate into a larger ERP system – and all are limited to a set number of transactions – such as 100 products in total, or 20 orders every month.

For any additional features, or the ability to scale up, these free software platforms will charge monthly fees, usually dependent on the number of users, number of products being managed, and number of orders processed.

For any company that operates at a scale larger than that of a startup or boutique, these pricing models can create exorbitant invoices for your company – and at the enterprise level, these solutions lack any form of ROI, and quickly become a burden to your bottom line.”

Even enterprise level software can fail to truly meet the standard of market fluidity national and multi-national brands face. While many ERP systems are designed to be customized to various industries, this is akin to designing your own app with a drag-and-drop software.

Options such as these also lack true integration within your environment – these platforms are intended to replace aspects of, or even the entirety of your enterprise environment, and not to work within the architecture your company has worked with for years.

Enterprise environments take years, sometimes even decades to truly be implemented, and they are continuously adapting and upgrading as technology improves and markets dictate more speed and customer value. Brands that can truly be classified as “enterprise level” are no different – cultivating a national or multinational brand is an undertaking that can take a full generation, and requires continuous observation and tinkering to keep growing, and stay relevant in the public’s eye.

For a brand that took twenty years to rise to the level that it is now, it is much smarter to invest in the future, rather than the present – and using an proprietary third party software for inventory management is investing for the short term rather than the long term.

Finally, many inventory management systems lack mobile integration – a necessity to maintain speed and efficiency in a truly connected enterprise environment.

Customized solutions increase efficiency

An inventory management system can do a lot more than tell you when levels are low on a certain product. With a custom platform fully integrated within the rest of your ERP environment, you can track detailed data points such as a product’s physical location in your warehouse, or the system can automatically determine the optimal time for re-ordering products: based on data points such as available shipping routes or closest supplier, and even down to weather patterns that might effect delivery schedules.

A more sophisticated inventory management system goes beyond tracking the sale of a type of product – with RFID integration, when scanned by your POS system, individual products can be tracked and recorded as they are sold. With data as intricate as this, a custom inventory platform is able to aggregate sales data in order to automatically generate reports that provide insight into optimal production times and when demand increases or decreases.

When working with a custom inventory management system, all of this data will automatically populate in their respective reports for your different departments, warehouses, and offices – whether spread throughout town, or across the globe. Via realtime integration, your service team in St. Louis will be aware of a part being shipped out from New Delhi, and your accounting firm in New York will receive the purchase order.

A system such as this provides you with a detailed view of the entire history of a product – from production to the final sale. This can be further broken down into the order history of each part, that when pieced together create a finished product – meaning you can analyze the intricacies of your entire operations through a single program.

Most importantly, all of these features can be accessed and utilized via mobile device – meaning your business developers out in the field have the latest data, and your CCO in Denmark has access to the latest numbers.

A major benefit to custom inventory management solutions is the fact that your internal IT department needn’t learn new systems architecture and languages, or restructure to fit the limitations of a piece of third party software – when built custom, languages that are commonly used throughout legacy systems, like .NET or COBOL are valid options. This isn’t so with proprietary software.

Improve customer value and satisfaction

A custom inventory platform, when fully integrated within your enterprise environment, is an efficient method for increasing your customer satisfaction. This is the ultimate goal of an inventory management system – customers can reliably count on your item stock, and B2B connections can trust your operations and records.

With the additional insight big data analytics can provide your production and sales, your enterprise can take the next leap towards continual improvement in efficiency.