How to: Find a top app designer

Finding the right app designer is a process that should never be taken lightly – there are so many app development companies out there, and each has their own approach to app design. So how are you supposed to know what to look for? How do you cut through all the chaff? How do you find your top app designer?

The only fool-proof method for discerning what makes good design is to know it yourself – so, before we go over how to find a top app designer, let’s look into what makes a well-designed app.

For a general guide to finding a mobile app developer, visit our blog on the topic: How to find the perfect mobile app developer.

Knowing is half the battle

There’s a quote I’d like to put here before we get any further:

“Form follows function – that has been misunderstood. Form and function should be one, joined in a spiritual union.”

It’s a quote from probably the most famous architect in modern history, Frank Lloyd Wright – and a re-framing of his mentor’s original words: “Form follows function.” What Wright wanted to impart to other designers was that (at least in contemporary terminology) good user experience and good design are one in the same, and go inescapably go hand-in-hand.

Users are named as such because they use apps to accomplish something; just as important as the why of an app, is the how it goes about accomplishing said task. That “how” is where good design lives.

In order to know how you want your app to look, feel, and act, you first need to know why it will do the things it does.

Discovering your pain point

Every app helps play a part in the solution to a pain point. Whether it’s a consumer-facing productivity app, a mobile game, or an enterprise level app, they’re all meant to help solve a problem their audience faces throughout their day, week, or lives.

There’s three main ways you can go about discovering your app’s pain point – through identifying a pain point in your own life, from conducting market research into a particular market or audience, or from identifying key areas of your business operations to improve upon.

No matter the origin of your pain point, the most crucial aspect to determining your app’s success is to make sure your app will help solve a problem that’s worth solving. When it comes to app pain point ideation, I like to think of another quote – this one from my poetry professor in college: “Write about grief. Not a grievance.”

Now, we’re not writing poetry here, but it cuts to the core of the idea – a pain point is, by definition, painful. For an app to fall into the realm of truly valuable, the pain point it solves must be worthy of its namesake.

What makes a good pain point?

Not all problems are made equal. Some pain points just aren’t all that painful, and some don’t fit well in a digital medium. Let’s go over the four determining factors for judging the quality of your app’s pain point:

Frequency

While these factors aren’t listed in any particular order, this facet may be the most important. All apps on both The App Store and Google Play are ranked by a few different metrics – of which user retention plays a significant role in determining their ranking.

User retention is the frequency at which users engage with your app – and different types of apps can expect different engagement rates. A customer-facing app that updates users on their electrical usage might be checked once a week, or once every month. A fitness app can be expected to be opened at least a few times a week, and apps like mobile games can sometimes expect engagement rates of multiple sessions per day.

Mobile games high engagement rate is due to providing a solution to the number one pain point of all time: boredom. Because of this, mobile games do often see high retention numbers in the short term – they do, however, struggle to maintain that retention over time. As users become more familiar with a game, the pull of a new experience diminishes – and eventually, leads to the pain point the game was originally intending to solve.

When determining the feasibility of an app, always keep the expected user engagement frequency in mind – it will help you plan your push notification campaigns.

This can be especially important for apps that are centered around once-a-year timings, like a Black Friday bargain app. This app would want to start its push notification campaign the day after Halloween, and ramp up until Thanksgiving evening. In order to be successful, a Black Friday app would need to maximize its user engagement throughout all of November.

Context

There’s a rule I named myself – I call it the “subway-cornfield” rule. Basically, it means your app should behave the same no matter where a user is engaging with it – whether they’re standing in a subway, or the middle of a cornfield.

When designing your app, however, it’s main use case should be carefully considered – while it should work well in all situations, it should excel in a select few. For instance, compare the UI of Google Maps to that of Facebook:

Google Maps vs FB

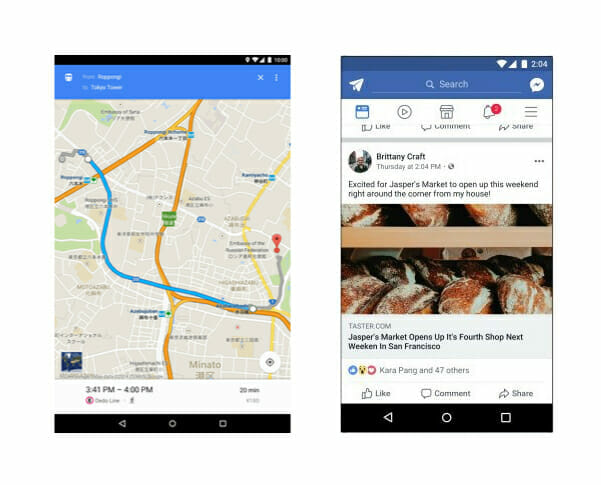
While there’s only a few buttons and fields to interact with through Google Maps, Facebook’s UI has a substantial number of options from which to select. Why is this?

I don’t know about you, but when I’m interacting with Google Maps, I’m usually already in my car, moving, and need to keep my eyes on the road. A user on the move is Google Maps’ main use case – so in order to provide the best experience, the UI was designed to be as simple as possible. With a simple UI, the solution to the pain point of being lost is solved faster – which keeps users’ eyes on the road, and not on there phones.

This provides the user (and those around them) with a better (and safer) user experience.

*NS804 in no way condones using your phone while driving*

Also note how information is presented in Google Maps – important roads are highlighted with a strict hierarchy: blue for the route the user is taking, orange for highways and interstates, yellow for main thoroughfares, and white for side streets.

From a zoomed-out perspective, only major landmarks, parks, neighborhoods, roads, and businesses are named – as you zoom-in, names auto-populate as visual space becomes available.

All of these design choices are both intentional, and important to Google Maps’ UX. When less information is presented to a user on a single screen, they’re able to more quickly take in the information they actually need.

Facebook’s mobile app takes the direct opposite approach – users are given lots of options and information (both visual and written) to consume. Facebook’s main mobile use case is someone who is both bored, and has the time to engage with the app. Due to this, Facebook is designed to keep users scrolling for much longer periods of time than a user would spend with Google Maps.

Marketability

There’s a cold hard truth every app has to face: you have to make money somehow. There’s another quote I’d like to share, this one from Mark Fischbach: “If the app is free, you’re the product.”

This doesn’t necessarily mean every free app is collecting and selling your personal data (here’s to you, Facebook), but free apps more often than not do have some form of monetization that revolves around an entity purchasing user’s time or views. Advertisers purchase space on a free app in order to capture the attention of users – just as platforms will offer free versions of an app in order to entice users to purchase the premium version.

Here’s a list of a few app monetization models:

  • Paid download
  • Subscription fee
  • Ads
  • Take a percentage of sales

No matter what, your app must provide a good enough solution to its pain point for people to be willing to spend money on it. Keep in mind what monetization model your app will implement – it will help you streamline your design and development schedule.

Longevity

Remember the mobile gaming example? App longevity is a key factor in determining if a pain point is worth it.

If an app solves a once-in-a-lifetime, or even a once-every-five-years pain point, it probably doesn’t need to be an app. There is one exception, however – a use case that isn’t reoccurring for the individual, but is widely spread throughout the population as a whole. Or, put simply – something that you might only deal with every few years, but at least a few people deal with every day.

Here’s an example; you don’t paint your house every day. You don’t, however, see a lack of painting companies – both suppliers and actual painters. Just because a single family only repaints there house every five years, or even once a decade, there’s always a few houses with a fresh coat of paint.

An AR app that allows users to play with the color of their walls when selecting what color paint they want to purchase may only be used once by that individual; but as a wide-spread pain point with a straightforward and easy solution, it will continue to be used by other users in other houses the next day.

There’s a lot more to proper app design – we just wanted to give you an introduction to the thought process behind good UI/UX, and what ultimately lays the groundwork for a well-designed app. We’ll be getting deeper into the subject in the future.

For now, let’s get to the actual finding part. First thing’s first…

Don’t use Google to find designers

There are already companies dedicated to finding designers for you. Two sources you can trust are Clutch and The Manifest. There are a lot of sites out there that showcase app design companies – but these two you can trust, as they use information from a designer’s client history, client reviews, as well as ability to deliver in order to determine rankings, rather than a payment hierarchy method.

Using Clutch

Clutch gives you the ability to find app design companies, set what parameters you want to use to find them (by platform, vertical, or location), and provides you with a breakdown of that designer – from client reviews to service lines, and from industry focus to what types of business they’ve worked with in the past.

Clutch also hosts a blog where you can find information covering everything from B2B marketing to ASO and beyond.

A nice feature Clutch offers are badges, which developers can display on their site to show that they’re trustworthy. If you see a developer with a Clutch badge, they mean business, and you can rest assured they know what they’re doing.

Using The Manifest

The Manifest operates in largely the same manner as Clutch. The Manifest offers industry leader shortlists, and a blog hosting great thought pieces and business advice.

Like Clutch, The Manifest will offer a short bio and client history for each development firm, so you can get a feel for what each developer brings to the table.

And with that…

You’re all set! Happy hunting!

Just remember that you’re always going to have questions – and that’s okay. A good designer will either have an answer for you, or do what they can to find one. Most importantly, your personal preference and business needs should always be taken into account, and if a website is telling you x is the better choice, but you have a good feeling about y, go with your gut.

How much does it cost to implement real-time updates in your app?

We’re on to the next chapter of how much does it cost to make an app?, and this addition we’re covering real-time updates. At their most basic level, real-time updates provide data that allows users to make more pertinent and informed decisions, and to then take action (at the right time) based on that data.

There isn’t one single real-time updating method for apps, however – just like anything that is built through software development. So, how much does real-time implementation cost you? Well, to keep the trend going, it all depends on what you want to achieve.

It’s important to note that for all types of real-time updates, there are two significant factors to their cost – time to build/implement, and the cost of data transfer throughout the lifetime of your app. If you’ve read our blog about how much it costs to implement a GPS/mapping API?, you’ll be familiar with the idea that every request made from a client to an API has a monetary cost associated with it.

The same goes for real-time updates (in fact, GPS and mapping APIs use real-time updating to function), and each data transfer will have a cost that comes along with it (for many reasons).

Let’s get into how these functionalities work:

The mechanisms behind real-time

There’s a lot of tasks real-time updating can accomplish – from detecting fraud at the moment of a transaction, to sending out the latest and greatest offer to a customer near your store’s location via proximity marketing.

Updating a device with data from a server can only be accomplished in a few different ways, however:

Polling

The simplest form of real-time data transfer is called polling. It’s the equivalent to knocking on your neighbor’s door at regular intervals until they answer. Or, for a more real-world example, it’s when a client continuously requests data from a server, based on set intervals of time.

While it is easy to implement, it’s a very inefficient form of data transfer – even if there is no change of state in the server, data will still be transferred every minute, or five minutes, or whatever pre-determined period of time you set. This forces you to play a balancing game against just how close to real-time you want your app to be, versus the cost to do so. The more requests you have, the more servers you need – which comes with higher infrastructure investment requirements, as well as higher maintenance costs.

The more data requests and transfers a server handles, the higher your costs will be. On the other side of the coin, if you don’t allow for enough server requests, your app won’t actually be updating itself in real-time – it’ll be more like what-happened-five-minutes-ago-time.


SCHEDULE A CONSULTATION WITH AN APP DEVELOPMENT EXPERT TO GET A CUSTOMIZED QUOTE!

Long Polling

Long polling is very similar to polling, but with one key difference; rather than visiting your neighbor’s doorstep every minute, it’s like leaving a note on their door that says “come over when you’re ready.” In more realistic terms, it’s when a server only transfers data to a client if a change has been made to the data on the server.

While this does solve the cost issues associated with polling, it still comes with some pretty significant drawbacks:

  • Servers can sometimes be expected to hold on to massive amount of data
  • It is difficult to recover a session if a connection was lost with high reliability

Because of this, long polling has the potential to become a burden to large scale apps that require a high frequency of updates, or utilize segmented campaigns to target specific user groups.

Websockets

Websockets can be thought of as a tool that turns a client into a server – it allows the client to both make and listen for data requests – giving the actual server the ability to very easily update the client.

Websockets function by the client providing what is called a callbackURL. These can be thought of as the phone number the server dials when it wants to transfer data to the client.

What this means is that because a client can actively listen to the server, there is no data transferred until a change has been made to the status of the server, and if connection is lost between the server and the client, it doesn’t matter, because the client will resume its active listening pattern.

It’s the digital version of installing a camera on your neighbor’s front door so you know when they’re home – except less restraining-order-worthy.

Note: “Websockets” and “webhooks” are easily confused terminology. Webhooks are used for server-to-server communication, and tell a server to send data to a specific URL. Websockets are used for server-to-client communication.


USE OUR APP COST CALCULATOR TO ESTIMATE THE COST TO BUILD YOUR APP!

Subscription Websockets

These are essentially the previously-mentioned websockets, and function in a very similar manner – the key difference is that they allow the client to determine what changes to data they want to be alerted about. For example, if a package delivery service uses a client-facing app, the client could select different types of data changes to receive alerts for: packed sent, package delayed, package delivered.

Methods of real-time implementation

There’s two pathways you can take towards implementing real-time updates: native development or through a third-party API.

If you’re going down the native development route, the cost of implementation varies depending on a multitude of factors, including: hourly rate, the complexity of the feature, the server infrastructure, and the amount of maintenance that will be required in the future.

Native development of real-time capabilities does come with perks, but its cost will ultimately come down to how much time you spend maintaining your server – while third party APIs come with reoccurring costs in the form of subscription fees – it’s a bit of a toss up as to which costs more. While natively run servers will cost less when everything is running smoothly, if something goes wrong, the maintenance fees fall to you.

Depending on the complexity of the real-time feature you’re implementing, your costs could range anywhere from $10,000 to $25,000.

Let’s go over some of the third-party APIs available:

Apache Kafka

Kafka can be used for messaging, website activity tracking, log aggregation, stream processing, and event sourcing. Like everything under the Apache license, it’s open source, and therefore free API to implement.

PubNub

PubNub can provide real-time integration for chat features, IoT device communication and streaming, mapping, GPS, push notifications, and alerts. PubNub’s services start at $49 per month, plus data transaction fees.

Fanout

Fanout.io serves as a proxy for real-time updates. Fanout also allows you to develop your own APIs alongside their service, so you can provide your own customization based on your app’s specific needs. Fanout costs $25 per month, plus data transaction fees.

Realtime

Realtime.co is a message broker that operates in real time through the cloud. It can be used for cross platform apps – and has SDKs to go with both Android and iOS. Realtime’s pricing starts at $49 per month plus data transactions, and goes up to $250 per month plus data transactions.

AWS AppSync

Amazon Web Services offers their own real-time updating API called AppSync. AppSync can be implemented for almost every use case imaginable. AppSync’s services cost $4.00 per million query and data modification operations, $2.00 per million real-time updates, and $0.08 per million minutes of connection to the AWS AppSync service.

Firebase

Firebase – Google’s comprehensive mobile development platform – has two different real time services: Realtime Database and Cloud Firestore.

Realtime Database stores your data on a single JSON (JavaScript Object Notation) tree. JSON is a “lightweight data-interchange format,” and is easily readable and writeable by people, and quickly parsed and generated by computers.

Cloud Firestore stores data in documents, which are organized and stored in collections. Documents serve as the unit of storage, and are written in a syntax extremely similar to JSON. Documents can be broken into sub-collections and nested objects, which are referred to as maps.

Both Realtime and Firestore are NoSQL databases, which come with their own pros and cons when compared to more traditional SQL databases. While SQL databases are organized to write data in a very efficient manner; NoSQL databases are organized to read data quickly, but due to their structure, require duplicate data in order to access information.

You can think of a SQL database as a collection of tables that hold very specific, uniform sets of information, that link up in a web. NoSQL databases are structured in branches, which lead to other branches, which lead to other branches.

NoSQL

Basically, when data needs to be shared instantaneously across hundreds, thousands, or even millions of devices, NoSQL databases are very efficient because of their data structure. Both Realtime Database and Cloud Firestore offer real-time and offline support with SDKs specifically built for mobile. Both are capable of being implemented for pretty much every real-time use case you can think of – from chat to re-sizing photos, to analytics and machine learning.

If you know your app will only be used by a relatively small audience in a localized area, and your data sets are straight-forward, go with Realtime Database. Cloud Firestore horizontally scalable – meaning it works better than Realtime Database when used across multiple localized areas, as you don’t need to create shards in order to do so. Because of Firestore’s structure, data is very easily split between different servers.

The Firebase payment model starts at a free version, and has two other plans: $25 a month, and a pay-as-you-go option.

Apps that utilize real-time

Sometimes, it’s a bit difficult to imagine what kinds of apps use real-time features in order to work properly, or improve their UX. So, here are some real-world examples of apps that use real-time tech:

Uber

Real-time tech is the backbone of Uber. Without it, users wouldn’t know where their driver was, driver’s wouldn’t know the location of their passengers, and GPS wouldn’t work.

SafeLite Auto

Much in the same way Uber relies on real-time updates to track its drivers, so to does Safelite’s app, which provides users with the location and ETA for a mobile technician.

WhatsApp

WhatsApp uses real-time updates for chat, voice, and video features. This is necessary for low-latency communication, and keeps conversations smooth, with even pacing, and no downtime.

Dominos

Real-time updates are how Dominos keep customers informed about the status of their pizza order – when it’s in the oven, when it’s ready for pick up, or when it’s out for delivery.

Inventory management

Inventory management at scale would be completely impossible without real-time updating capabilities. Keeping accurate track of your company’s stock requires knowing your exact inventory numbers every moment – when you’re working at a national or global scale, conversions can happen at rates that can only be tracked through real-time updates.

Your options for real-time

There’s plenty more services out there – but what’s important to know is that just like most software services, the costs of a real-time APIs increase with the scale of your app. If you’re going the native development route, your costs will largely rely on how much infrastructure investment is required, as well as your servers’ maintenance costs.

How much does it cost to implement login capabilities?

There’s a lot of apps that require a login feature – mostly out of necessity for the app to work properly – but data has shown giving users the ability to personalize their experience within your app is a powerful UX strategy when used to increase your user retention.

There is, however, one major downside to including the requirement that users set up a profile before they can fully utilize your app: app abandonment due to first impressions.

If users are met with a proverbial checklist of requirements to complete before they can actually use your app, they’re much more likely to give up before proceeding. This is where implementing a login through social feature comes into play – it gives your first-time users the ability to create a profile with one tap, rather than filling out forms and fields.

So, how much does this user-retention-saving feature cost?

Honestly, not too much – it all depends on how secure you want it to be. If you use our favorite app analytics platform, Kumulos, it can take anywhere from 1-3 hours to implement a login feature with an app, depending on the complexity.

Implementing a login feature with the lowest form of security (basic authentication) can cost as little as $100 to implement. Apps that want to utilize the highest levels of security can expect a cost of $10,000 for a login feature implementation.

When it comes to the cost of implementing logins with social media, such as Facebook, or Instagram, there is no extra cost – just the addition to the time it takes to actually implement. The price of these social login features comes from labor cost – the APIs themselves are free.

Let’s look into why adding these extra layers of security can cause such a drastic change in total cost, and, if the added security is worth it in the long run.

The costs of security

There’s many different forms of security when it comes to user authentication. The costs of which can vary depending on many different factors – ranging from time to develop to the cost of physical infrastructure.

There is something important to keep in mind in regards to the cost of security: the cost of code only changes if you are implementing third party APIs that come with a price tag or subscription fee – implementing your own code to allow for security that exists in a digital space only comes with different associated costs due to one factor: time to develop.

Let’s cover those:

Basic Authentication

The least complex login method is called basic authentication. Let’s go over how user authentication (at its most basic levels) works:

  1. A user enters their credentials
  2. Those credentials are sent to an authentication server
  3. The server will then attempt to match the credentials together
  4. Upon a match, the server authorizes the user’s attempted access

This process is faster than it sounds – it happens every time you login to a website that requires your username and password, such as your bank. This process is also referred to as “logon” authentication.

Single-Sign-On (SSO)

SSO functions very similarly to logon authentication, but rather than granting access to a single server, it grants access to multiple – a lot of social media and email websites will use this feature.

While SSO is the least secure method (as it gives access to multiple servers), it works well for apps for two reasons – smartphones are generally intimately used devices, so the chances of someone physically accessing your personal information via your smartphone is diminished; and, SSO does wonders for user retention, which is a hard-fought battle for most apps.

IPSec

IPSec is the most secure form of user authentication. IPSec allows data to be encrypted and authenticated over a secure internet protocol network. In order for the user’s device to understand, and then display the correct information based on the encrypted data, a method called mutual authentication is used.

This happens at the first instance of the user logging in, and continues to happen throughout the session as cryptographic keys are exchanged over the secure server. This can be implemented in three types of data transfer: user-to-user, network-to-network, and network-to-user.

Biometrics

Biometric security is largely implemented through physical means, and utilized in mainly on-site locations, rather than remote – therefore, its most common use case is in buildings that require high amounts of security.

Current biometric capabilities include finger print scanners, voice recognition, and retinal and face scanners. These capabilities are rapidly changing and expanding into different realms of biometrics, such as heartbeat and even brain activity.

Biometric security is a high cost investment, as it requires specialized scanning equipment – because of this, its costs can greatly exceed $10,000 – this number depends heavily on the scale and amount of scanning devices required.

Token Authentication

Token authentication requires a user to physically possess a device, such as a dongle, card, or RFID chip (plus a password) in order to access a secure system. While this is a highly robust method of security, due to the requirement of both an actual device and password needed to be used to access a server or system, it mainly only works for organizations that have the infrastructure necessary to implement an extensive system such as this.

Transaction Authentication

Transaction authentication is a pretty straightforward security method. In essence, it boils down to this: If a transaction (via credit card or payment service) seems suspicious, the person making the transaction will be prompted to take extra steps in order to verify that they are indeed the person they claim to be.

While the idea of asking someone “Are you sure you are who you say you are?” Is a simple security measure to wrap your head around, the systems required to make that process possible are intricate and costly – and require a significant amount of investment in infrastructure.

This is largely due to the fact that you must first have significant amounts of data for each customer profile before you can start defining suspicious account activity, and then flagging errant transactions.

Multi-factor Authentication (MFA)

Multi-factor authentication simply means mixing two types of user authentication together into a single authentication process. For instance, the example we used for biometric authentication (requiring bio-data and a password) can be classified as MFA, or, our example of token authentication – requiring a user possess both a device and password.

Out-of-band Authentication (OOB)

Out-of-band authentication validates login requests by requiring the user to provide information that can only be accessed by a device different from the one they are currently using to log on. For example:

When you login to your car insurance website, but before you do, you receive a text message containing an access code that is only valid for a limited amount of time. You then enter that code into the website, and you finish the login process.

This is a method of security that has a very applicable use case for an app that needs a high degree of security.

The costs of not using secure login authentication

First, it’s important to get one thing clear – if your app doesn’t make use of sensitive or highly personal information, go ahead with SSO. There are options you can take to implement extra layers of security on the initial login authentication.

If your app does make use of sensitive info, however, it’s vitally important to your user retention, brand equity, and business in general to use the highest levels of security. When comparing the cost of $10,000 to the cost a negative user review and rating can do to your app’s ranking, it’s definitely worth the upfront cost.

A perfect example of this is what happened to Facebook and its reputation after the Cambridge Analytica scandal; 1 in 10 American users deleted their actual profile, and 26% of American users deleted Facebook’s app from their devices.

Their brand is irreparably ruined in the eyes of some of its former customers – 15% of users who responded to a survey conducted by market intelligence firm Creative Strategies and Techpinions said there was nothing Facebook could do to regain their trust.

This was the response to a social media company’s mishandling of user data – now just imagine what the fallout would be if your sensitive-data-based app mishandled users’ personal information.

Context is key

When budgeting for a login feature with your mobile app, it all comes down to how secure your app needs to be. Basic user authentication can be implemented for as little as $100, and IPSec can reach the realm of $10,000.

Why D&D is the perfect team building exercise for your company

“You feel the rotting plank give way beneath your boot, and watch as the shattered splinters fall the hundred-or-so feet that separate you from the roaring rapids of the river below.

You hear the snap of a rope from the cliffside ahead of you, and then feel the bridge jolt.

What do you do?”

This is the kind of situation Dungeons and Dragons players find themselves in all the time. And it makes D&D the perfect exercise for improving your employees’ collaborative, interpersonal, and problem solving skills. No, seriously.

Why? Because unlike other team building exercises, D&D necessitates that everyone involved pretends to be someone else – making it much easier to self-reflect and be open to new ideas. It’s not them in the situation, it’s the character they’re pretending to be. It’s a game about working with what you have, rather than what you want – and how you can use what’s available to you in the moment, in order to solve the problem at hand.

In other words, it fosters the growth – and eventual mastery – of personal qualities and traits that make a great team player. There’s also the added benefit of having a lot of fun while playing it.

So, how do these pretend skills transfer over to the professional world? Let’s get into it:

Confidence

“I cast grasping vine, originating from the cliff-wall.”

“What’s your target?”

“The rope that snapped.”

Confidence is key to any successful career, but it’s absolutely necessary for a team to remain cohesive and productive – take, for example, a development team in the middle of code review during the end of an agile sprint. The programmers need to be confident in the code they made, so they are able to clearly explain their work – the person reviewing the code needs to be confident in the decisions they make as well – without clear and concise goals, productivity suffers.

Knowing how to set goals – and how stick to them – requires a certain level of confidence. There are moments that (quite) often pop up throughout the work day that could end up throwing a wrench in your plans – having the confidence to tackle those issues on the fly is something D&D teaches extremely well. If you don’t make a decision fast enough, your character, or other party members, can die.

D&D teaches you how to pivot quickly – and not just by yourself, based on your own skill set – for every decision a player makes (and the confidence that decision requires), they must also balance that decision against the needs of the team as a whole. They need to have the confidence to be able to say: “No, Sam has a spell better suited to this situation. I’ll save my spell slot for later.”

You’d be surprised what happens to someone’s confidence levels when they’re pretending to be someone else. It’s a freeing feeling – you can be whoever you want to be – the dashing rogue, the devout paladin, the quick-witted wizard. When you’re playing the role of someone else in a fantasy world, it’s easy to gain the confidence necessary to say “I got this,” or, on the other side of the confidence coin, “I’ve got your back.”

Someone who isn’t comfortable making snap-decisions in real life might find themselves more willing, or even ready to go with their gut. The employee who is insecure about their role in their team has the freedom to make mistakes without worry – as well as the freedom to let go of controlling every aspect of a project – which gives everyone more room to grow, and at a quicker pace to boot.

These are all very transferable character traits to working in an office setting as part of a team.

Humility

“I cast feather fall.”

There’s two ways D&D promotes humility – everyone will die if they don’t work together, and in order to pretend to be a different person, you have to get over yourself.

Yes, you can do whatever you want, but that also means anything can happen. The plan you cooked up might fall apart due to one unlucky roll, the GM might surprise your party, a locked door might halt your progress.

A rope bridge might snap as you cross a chasm.

Players learn the humility to accept that bad things happen – as well as the humility of when to bow out and let someone who is more suited to a task handle it.

This goes both ways – a character with high athletics might be able to scale a wall without a hitch – but other members of their party might see it as an unsurmountable obstacle. Players need to learn how to not only pass the torch, but how to reach back down and lift each other up.

This teaches an important team building mindset – taking the time to help each other out. Often, projects miss deadlines because of a hiccup somewhere down the line – not because everyone failed at the task at hand. When your team members are willing to put their work aside for a few minutes, or even a few hours, project derailment becomes a thing of the past.

A rising tide floats all boats – but in order for this type of teamwork to consistently happen, your team members need to be humble enough to pay attention to their teammates – and be willing to “run to the roar” when something happens.

The other aspect of humility that D&D teaches is that it’s okay to be open. From an outsiders’ perspective, a session of D&D can look extremely silly – even a little crazy, depending on what’s currently happening in the land of make believe.

Pretending to be someone else in front of a bunch of professional adults is a very humbling and personal experience. But the game will implicitly teach your team that the more they are open with themselves and the other players, the deeper the story, the better the experience, and the more fun everyone has.

This is a great way to instill an inherent value for diversity amongst your team – it’s the differences in skillsets that make each character invaluable, just like without creatives and strategic thinkers, business can’t happen.

Problem Solving

“How far are we from the cliff?”

In D&D, there’s no limit to the options a player can take to solve the problem they’re presented with. This means the players are using real skills to solve pretend problems – it’s all the skill-building with none of the pressure that comes with real world issues.

There’s one caveat though – no single player can solve every problem on their own. “Don’t split the party,” isn’t just sage advice for D&D players – it’s just as poignant for businesses as well. I can’t believe I’m about to write this sentence, but synergistic collaboration is key to a successful project.

Just like in real life, in D&D, when presented with a problem, you use the tools available to you to solve said problem. The difference is, in D&D, you can be presented with problems that wouldn’t be physically possible in the real world.

When people are given the option to practice skills, such as problem-solving, in a fantastical setting, it’s not as disheartening if you make a mistake – it’s these moments of temporary failure that bring humor and flavor into the game as well.

The comfort D&D brings to a skill-building experience is essential to its ability to teach these skills. The best part is that it teaches these personal skills in a highly interpersonal setting, solidifying your team’s ability to simultaneously solve problems through…

Collaboration

“I give Sarah my rope.”

“I take John’s rope and tie it around one of my arrows.”

If something happens in a session of D&D, it happens to everyone. Because of this, a game of D&D can be broken down into a pretty simple formula:

ALM

Again, the medium that a session of D&D exists in plays a key role in the power of the game’s skill building. The problems the party faces aren’t mundane or tedious – they’re exciting. Sometimes terrifying, sometimes desperate, sometimes hilarious. When your (pretend) life, and the (again, pretend) lives of your teammates are on the line, it makes the lessons you learn stick that much more than a typical team-building exercise.

Players have the freedom to figure out how to solve these often (pretend) life-threatening situations, without the consequence of actual death. You get to slay dragons together. Have each other’s backs in the deepest, darkest caves. Save kingdoms, and topple evil empires.

You’d be surprised at the bond a party will build with each other – and not just in-game. You’ll find your party to be much more in-tune in real life as well.

Seriously

Try out a session of D&D with your team. Downloading character sheets is free, and a set of dice is less than $5. A session of D&D can be as short as two hours. Give it a roll.

NS804 – What we’re all about

We were recently named a top boutique app developer of 2019 by Clutch. It’s kind of awkward, if we’re going to be honest. Not because we think we don’t deserve it, or aren’t honored to be included next to developers like Dogtown Media and Red Foundry – it’s just we don’t usually talk about ourselves.

If you’re a reoccurring reader, you’ll know we pitch the services of our good friend Kumulos more than we do our own. We’d much rather talk about the awesome platforms clients of our’s have invented, like Lauren Bell’s product and safety recall app, Whystle.

This leaves this blog in a sort of grey area for us, stuck in the classic PR branding kerfuffle – write about how humble you are. Awesome.

So, let’s start with the important things:

What did you do over the weekend?

Well, while everyone was enjoying the three day weekend (if you’re in the U.S. at least), we were making the most out of the time we had – with our four day weekend. Our CEO has a family he enjoys spending time with, and we all have families, hobbies, and lives in general outside of work; so we work ten hour days (none of that lunchtime not counting stuff, either), and make every weekend a three day weekend.

Our senior UX/UI designer went to a music festival in Illinois, our business developer spent the weekend soaking up sun by the pool with his family, our senior Swift developer got a new apartment, and our project manager went to Miami, Florida. I spent the weekend hanging out in my favorite city…

Richmond

A few of us have been here our whole lives. Others hail from Indonesia, Boston, Colorado, California, NoVA, and Atlanta. We all found our way here by forging different paths, but NS804 brought us together. And I’m glad, because…

The people I get to work with are awesome

What do a sommelier, a wildlife rescue volunteer, a soccer coach, two dogs, and a cosplayer all have in common? They all work at NS804. We’ve got degrees from top-10-in-the-nation schools, self-taught programmers (the best kind of developer), and a CEO that’s built more successful businesses than you can count on one hand.

This is the business he always wanted to make, and when you’re here, you can tell. There’s passion present in every project we work on – not only because of the awesome ideas our clients bring to the table, but the fact that working with our CEO, and the team in general, is pretty darn fun.

We speak six different languages here at NS804, and that’s not including Swift, Java, and all the other programming languages our dev teams know. Our senior Swift developer taught herself Italian before she taught herself Swift.

And speaking of women in the workplace – our office is majority women, and in high places too. The following teams are led by women: project management, UX/UI, Swift development, accounting, HR, and content management (your’s truly).

So, thank you Clutch, for ranking us as a top boutique app developer for 2019! It means a lot – but what matters the most is that we get to do work we love, for great clients, with the people that inspire us to work harder – not to compete, but because we bring out the best in each other.

How much does it cost to implement backend CRM software?

Continuing with our quest to provide you with the most comprehensive answer to the question: how much does it cost to make an app?, it’s our next addition to the fray – and this time, we’re going over the cost of backend CRM (Customer Relationship Management) integration.

There’s the usual simple answer (that really doesn’t answer anything): it depends on the complexity of the CRM software and the mobile app that goes with it.

There’s also two different options, both of which come with widely differing upfront and lifetime costs and value:

  1. Purchasing (and then implementing) a third party CRM API = low upfront cost, high lifetime cost, low lifetime value
  2. Building your own custom CRM software, and then integrating it with the backend of your internal app = high upfront cost, medium lifetime cost, high lifetime value

If you want to go the third-party API route, the answer ultimately comes down to the SaaS provider you chose to go with. Going the custom CRM software route, will, in the long run, save you both time and money.

Before we get into the reasons as to why, we’re going to cover the basics of the functionalities a CRM software can provide – so when you’re planning out your own internal business app’s development (and the backend integration of its sister CRM software), you’ll know what to expect.

CRM software functionality

CRM software is designed with the intention of providing a hub for every aspect of managing your business’ relationships with its customers:

  • Management of: Contacts, leads, prospects, affiliates, and partners
  • Customer data: Storage and processing
  • Customer profiles: Personal data, contact information, history of past purchases
  • Process automation: Syncing communications, automating reports as well as email (and sometimes text) marketing efforts

Let’s go over the features that make those functionalities possible.

Lead management

Keeping track of leads is crucial in today’s market – and it’s no longer only large corporations that deal with high volumes of clients – small business must compete at a global scale in order to keep up.

One of the most practical methods to increasing customer loyalty is to develop and maintain a personal connection with every customer – from their initial point of contact with your business onwards. In order to effectively accomplish this standard, lead management is a necessary and effective tool.

By using the lead management functionality CRM software provides, not only can you disseminate leads to the right people, you can automate your mid funnel processes; such as marketing and remarketing campaigns that utilize email or text campaigns that serve to keep customers engaged with your business, thereby creating (and increasing) lead generation.

A perfect example of the efficiency CRM software provides is the automation of leads’ contact information – when a client fills out their info on your website, it’s then added to their customer profile in your database.

When your sales team adds contact information to a customer profile from a lead they just created, the data ends up in the same place. Not only does this make it impossible to lose or duplicate information, it means that if a sales representative is no longer with your company, the lead’s info stays within your database – not on their personal phone.

Process Management

When was the meeting with David? No, the other David. You know – the one with the on-demand dog walking app?

CRM mitigates the wasted minutes in those kinds of conversations. If an account representative schedules a call with David-the-dog-walker, your account manager will know as well, because all the information David and his business can be found in the same place – his client profile in your CRM software.

Assigning tasks, scheduling meetings, making sure follow-up emails are sent, and phone calls are placed is simple when it’s automated. You can even set up automatic notifications to make sure no task is left by the wayside.

Speaking of keeping everything in the same place, let’s move on to…

CRM Dashboard capabilities

Everyone loves a good dashboard – and with CRM software, you can create customized dashboards for each facet of your operations – from sales and marketing to service automation and even accounting.

Dashboards are the perfect tool for helping your employees understand the big picture, the pieces and processes that make it up, and their role in your business’ operations as a whole. They’re also excellent more mobile devices, as they are the quickest way to find information on a smaller screen.

Auto-generated reports and invoicing

There’s not much to say here, other than CRM software will put the “I want those reports on my desk by 5,” cliche to rest. Instead of spending countless hours tracking down and then organizing information, you can just click a button.

There’s nothing quite as inefficient as spending money to fill and send out invoices. The time and money spent on filling out documents that are, by their very nature, asking customers for money is one of the more catch-22 moments in everyday business life. Just like reports, filling out invoices is a thing of the past with CRM software. The program already knows who bought what, where it’s going, and who’s receiving it.

Lead Scoring

Knowing who to go after at the right time is a skill business developers must hone over years of professional development. CRM software can be used to automatically track and score the engagement of your users, and then update their profiles with their current score.

With a system that can quickly analyze and interpret vast amounts of data and interactions, you can better measure your leads’ online behavior, email and social engagement, and any other channels you use to engage with customers.

Wrap all that up in an app

The best part is that all of those functionalities can be packed into a mobile app – through integrating your CRM software with your internal business app’s backend. This means that when your employees are away from their desks, out in the field, or serve a roll that keeps them on their feet, you can still make sure they’re in the know.

This doesn’t mean replacing your CRM software with an app – merely that it’s just as accessible and useful when your employees are in situations that require them to be away from their desk.

The cost of implementing CRM software with a mobile app

Funnily enough, the cost of implementing your CRM software with a mobile app is a pretty low cost- your custom CRM software is basically it’s own API, so it comes down to how much time it takes to connect the endpoints with the backend logic of your app. A typical rate to do this would range from $75 to $125 per hour.

The true cost of implementing CRM software with an app is the actual development of the CRM software itself – building out a CRM system with the features listed above is a process that typically takes (at least) a few years.

The time it takes to develop is inexorably tied to the scale and complexity of the needs of your company – which usually means the greater your need for CRM software, the higher the cost to develop. The upfront cost to begin development of custom CRM software can range (again, depending on complexity) from $50,000 to $75,000. Over the course of a few years of development, costs can range from $175,000 (for a simple CRM system), and $250,000 – $500,000 for a complex one.

Those are high numbers – but consider the longterm costs of continuously paying for a third party CRM software; when looking at the most popular CRM SaaS provider, the option with the most functionality is $300 per user per month. If you have 25 users, that means $7,500 per month, or $90,000 in one year.

So, even if your custom CRM system cost $500,000 to develop, that cost is basically paid for after five years. In regards to the long term cost, the custom CRM software will win every time. Not only does custom-built CRM software have a lower lifetime cost, it also comes with a better value – since it’s custom, it’s made to specifically improve your processes, not business practices in general. This makes your employees who use it even more efficient with their time, which leads to happier customers, and more sales.

How to build a MVP iOS app

Building an app is never a simple process – but there are steps you can take to make your app’s development as smooth as possible. In a follow up to our Which is the better platform for a MVP? blog, we’re going to go step-by-step through the development of a MVP iOS app – from ideation, through development and testing, and onto publishing, launch, and post-launch development.

If you’d like a refresher on MVP development, check out our blog post on Clutch.

But first…

We need to reiterate why we’re specifically going over iOS MVP app development, and not Android. While there’s a lot of reasons as to why iOS is the ideal platform for a MVP, there’s one aspect that we will be covering in detail throughout this blog – user engagement:

  • iOS users engage apps for nearly twice as long as their Android counterparts
  • iOS apps have a higher retention rate than Android apps
  • iOS users download more purchasable apps than Android users and spend more money on in-app purchases:

  • Gaming app average revenue per user: $1.99 (iOS) versus $1.56 (Android)
  • Shopping app average revenue per user: $19.64 (iOS) versus $11.49 (Android)
  • Travel app average revenue per user: $32.29 (iOS) versus $20.47 (Android)

It’s stats like these that make up a market better suited for a MVP – not to mention the faster development and testing time for iOS apps, which compliments (as well as keeps up with) the already quick development cycle that makes a MVP a MVP.

The steps to (quick) iOS development

It’s important to note that there is no shortcut to development – if you want to make a good app, at least. The trick to achieving the speed of development that an MVP is known for is to build an app that works with as little features as possible.

To a service-minded company or appreneur, this can sound counter-productive, or even go against mission statements that boil down to “providing the best service possible.”

But a MVPs end goal isn’t to remain as a minimum viable product – once a MVP has had a successful launch on the App Store, the development cycle continues in the form of updating the code base of your app to include more features.

The efficiency of a MVP comes from those aforementioned iOS user metrics; user engagement, in the form of constructive criticism and requests, will serve as your market research and your app’s beta test. This is one of the deciding factors in the lower cost of developing a MVP app – that, and the shorter amount of time actually spent in development and testing.

Let’s look a little deeper into things.

Step 1: MVP ideation

All apps should stick to features sets that help solve their pain point – but a MVP, by definition, must so. A simple way to make sure your app is only utilizing features that play a role in solving your pain point is to write a list of everything you want your app to do.

Then, take your idea and start trimming the fat – let’s take a look at an example:

Let’s pretend that it’s a few years back, and we’re currently in the process of ideation for Brew Trader. Brew Trader is an app that connects craft beer enthusiasts by providing them with a platform that serves as a medium through which to trade craft brews with others in their area.

So, we write out a list of everything we want it to do:

  • A map that shows the locations of bottles up for trade, and is updated continuously so users can see the latest offers, as well as the ability to move the locations of trade beacons
  • A user profile that contains information the user wishes to share, as well as the user’s entire collection of craft brews
  • A messenger so users can DM each other
  • A trade history so users can find other users based on past interactions
  • A bar-code scanner to populate information about bottles available for trade

Then, we edit that list down to what Brew Trader needs in order to function properly:

    A map that shows the locations of bottles up for trade, and is updated every 10 minutes so users can see up-to-date offers

  • A user profile that shows their bottles available for trade
  • A messenger so users can DM each other (while a significant feature set, this is necessary, so users are able to communicate meet-up times and locations)

All in all, that boils down to three different screens, which are built out in the next step.

Step 2: MVP UI/UX

Let’s take those three feature sets and break them down into the visual elements that will make up Brew Trader’s UI. First of all, just like 99% of iOS apps, we’re going to need a bottom menu navigation bar.

This is utilized in UI design so a user can quickly switch between the screens that contain the feature sets listed above. This bar will contain three icons, which will each signify one of the three screens – those being the map screen, the user profile screen, and the messenger.

The next thing to do is layout your different screens.

The map will be hooked up to a mapping API, such as Google Maps. Google Maps is free, as long as your app is free. If you’re looking for other options, check out our blog about how much it costs to implement a GPS & mapping API.

The next element of the map screen to design would be the trade beacons, as well as the sub view that would pop up when selecting a beacon – this sub view would present the name of the bottle up for trade, as well as the user whom it belongs to.

The next screen to design is the user profile section. For a MVP, this should be done in the simplest way possible – a section to add a thumbnail profile photo, and fields to add and view bottles that are up for trade.

The final screen, the messenger, can utilize a messaging API – many of these can be tweaked to match your app’s branding and color schemes.

That’s all you need to design if your making a MVP. Next in line is…

Step 3: Coding a MVP

iOS apps are built using Swift, which uses the following components to create an app’s architecture:

View Controller – Think of this as the frame of a painting. The view controller, which is aptly named, controls what you see on the screen of your mobile device.

View – Within the view controller is the view. Think of this as the canvas of a painting – the view makes up the sum of all visual aspects of the app. Each screen of an app is a different view.

Subview – Subviews are the individual sections that collectively make up the view. Think of a subview as specific sections of a painting, such as how the subject matter is distinguishable from the background. More specifically, a subview would be the keyboard section of iMessage, or the section where text messages display.

Buttons – Buttons are… well, buttons. Within subviews, buttons are the interactive elements of apps. Think of the individual letters of the keyboard section of iMessage.

Images – Also within subviews, images are used to display specific pieces of visual information, and range from photos to logos and icons. An image can function as a button.

When it comes to coding, there really isn’t any difference between programing a MVP, versus programming a fully-fledged app. The shorter development time of a MVP comes from the smaller number of features to implement, which means less UI to build out, and less backend logic to program.

If you’re looking for tips on how to avoid costly mistakes, check out our blog on app development pitfalls.

Step 4: MVP testing

While one of the upsides of a MVP is your early adopters serving as your beta test, you still do need to test your app before you send it off to the App Store. This is especially true for iOS apps, as they face a rigorous review process before they are officially published on the App Store.

Not only will your app be rejected if it isn’t robust enough for Apple’s standards, a buggy app will only serve to weigh your growth efforts down. Users are more likely to abandon an app than stick with it.

Because of this, you must iron out the kinks of your app before it launches. For tips on conducting app testing, check out our blog on the topic.

Step 5: Publishing

After your app has been thoroughly tested, it’s time to send it off to Apple for review and approval.

In order to publish your app to the App Store, you must pay a annual fee of $99. If your app costs money to download, or goes by a subscription model, Apple will take 30% of each sale.

That’s really all there is to publishing your MVP app – the publishing process doesn’t differ depending on what type of app you’re making. All apps on the App Store go through the same review process.

Step 6: Launch

Launching a MVP is largely the same as launching an other app, but there is one very important factor to note.

Users will make snap decision based on the first impression of your app. Users do, however, make exceptions for small hiccups if they are made aware of the possibility up front. The nature of a MVP app isn’t to be perfect, but rather to provide the best current solution to an unaddressed, or under-addressed pain point in your user’s lives.

In your App Store listing (which we’ll cover in detail below), you’ll want to include a section that explains three things:

  1. You understand that your app isn’t perfect, but you’re working on making it better
  2. Users can directly contact you to provide criticism or make requests for features
  3. Users can expect regular updates

Remember – users are more likely to delete your app from their phone than they are to keep it. This is why communication is important with your users – but doubly so with a MVP. Your users need to know from the start what they are downloading. They’ll be understanding if you’re upfront and transparent about your app. They’ll ignore, or even worse, spread bad word-of-mouth about your app if they are kept in the dark about what you’re doing.

Step 7: ASO

There are two fronts to your app’s ASO – User acquisition, and user retention. These can then be broken down into sub-categories:

User acquisition:

  • Keywords
  • The app’s build and compatibility
  • The app’s page on the App Store

User retention:

  • User reviews and ratings
  • Time users spend engaging with your app
  • In-app purchases (if applicable)

For a MVP, when it comes to a keyword campaign, focus on one main keyword, and derive from there until you have 5 keywords to work with. To continue with our example of Brew Trader, we’d use:

  • Beer
  • Beer Trade
  • Beer Swap
  • Beer App
  • Beer Finder

There’s a lot more to planning out and implementing a successful ASO campaign. For more information, visit our ASO: 101 blog post.

Step 8: MVP post-launch

This is the most important step of a MVPs development, as your execution here will determine the trajectory of your app’s future.

Start with both keeping track of analytics, and engaging with your users. Use every channel available to you to engage with your users – social media, push notifications, and responding to user reviews in the App Store itself.

For more information about tracking your app’s analytics, visit our guide to measuring your app’s success with Kumulos.

Next, you’ll want to start updating your app. In order to do this, start from step one – ideation. This time, however, use the requests and criticism, as well as your findings from your analytics to direct where you should be investing your time.

Guest blog: Google Analytics for mobile apps is shutting down. Users move to Kumulos Analytics.

This is a guest blog written by our good friends at Kumulos, specifically Caroline McClelland, Kumulos’ Marketing Manager.

With 17 years of marketing management experience in global organizations including information technology, financial services and retail, Caroline has great passion for mobile marketing and building high performing digital teams to work creatively in all areas of marketing.

The topic of this piece will undoubtably be a problem for lots of developers – but not so for us (NS804). We have always used Kumulos, our preferred mobile analytics platform, for the majority of our projects because of the quality of the service their platform provides.

Google Analytics for Mobile Apps is shutting down. If you use the free version of Google Analytics, and if you have a free Google Analytics property collecting data exclusively from the Google Analytics Services SDK (Android or iOS), you should already have been notified. So, if you are one of the many that are using GA for mobile analytics, now would be a good time to step back and think about which app analytics service is the best fit for your mobile app development business.

Join the many, many app developers making the move away from Google to Kumulos ahead of the shut-down. Developers with apps of all shapes and sizes across a broad range of industry verticals are choosing to move from Google Analytics for Mobile to Kumulos. They tell us it’s because we are the analytics platform that gives greater clarity on how the apps are performing both technically AND commercially.

Which is nice to hear, because that’s precisely what we’ve set out to deliver. The Kumulos single pane of glass means we make it easier to understand app download trends, user engagement, user retention and user behavior, alongside the technical performance of the app, and any API dependencies impacting on users. So, past Google Analytics customers now get a more comprehensive view on how the app is performing.

If you’ve yet to select an alternative app analytics tool, the mobile app performance team here at Kumulos, will tell you everything you need to know about moving along the well beaten path transitioning from Google Analytics for Mobile, to Kumulos.

GOOGLE ANALYTICS FOR MOBILE APPS – WHY IS IT SHUTTING DOWN?

Many in the mobile app development industry are not surprised at Google’s decision. For a long time, the mobile version of Google Analytics has been considered to be slightly flawed. So is it a good thing that they are finally shutting it down.

Well, according to trusted sources such as Simo Ahava, Google is wanting all GA users to migrate to Firebase Analytics. So that will mean a new system to learn, a new system to set up and from those in the know, Firebase Analytics falls short of what many serious mobile app publishers need. So for some, this will be a backward step.

And, it’s not just Google Analytics that’s impacted here. Google is now starting the process of deprecating the legacy Google Analytics for Mobile Apps. This covers all data collection SDKs that do not have the word Firebase included. Also, take note, the Google Analytics tags in Google Tag Manager for mobile apps will be impacted.

OCTOBER 31, 2019 = DEADLINE

Now that Google has started the process of deprecating their Google Analytics for Mobile Apps you need to take action. In fact, Google has already started to decommission properties that receive data exclusively from the Google Analytics Services SDK. Data collection and processing for such properties will stop on October 31, 2019.

However, reporting access through Google UI and API access will remain available for properties’ historical data until January 31, 2020.

After this though, the service will be fully shut down. These properties will no longer be accessible via Google Analytics UI or API, and data will be removed from Google Analytics servers.

BEING PUSHED TO FIREBASE?

Moving from Google Analytics to Firebase isn’t an easy switch. If you’ve already taken a look at Firebase you will see why!  Hopefully you’ve started to look at other players in the analytics field.

Despite the Firebase team making the user interface a little more intuitive it’s still not the easiest platform to understand. Firebase is known for having a very different approach to analytics, as it revolves around the duality of users and events. Yes, it’s a free app measurement solution that provides data on app usage and app user engagement, but it’s far from comprehensive, isn’t easy to understand and difficult to build actionable insights into how app performance can be improved.

However, you should use this time before October 31, 2019 to think carefully about what’s the best analytics tool for your mobile apps. Then, based on this, look around and see if there are alternative app reporting and analytics tools that better fit your needs.

ABOUT KUMULOS MOBILE APP ANALYTICS

Kumulos is used by a broad range of different organizations, from large multi-national enterprises to the software developers that build enterprise grade apps for their customers. If you build apps for your own customers then we can offer you something very different.

Kumulos App Performance Management platform comes with a comprehensive range of services covering the entire life cycle of the app. Its 5 integrated services include app store optimization, analytics & reporting, backend hosting, crash reporting & endpoint monitoring and its award winning push notifications service, which received awards from Business of Apps, Mobile App Daily and The Tool. It provides a management console for mobile app developers, like NS804, to gain comprehensive visibility on how all client apps are performing technically and commercially.

How much does it cost to implement wearables?

Just how much does it cost to implement wearable technology with your app? We have the answer, but before we get into it, let’s look into where the wearable market is today, and how it got there.

A brief history of the future

If there’s one burgeoning technology that has “future” written all over it, it’s wearable tech. From 2010 to about 2015, there seemed to be a contraction in the evolution of different types of consumer-facing hardware – sure, there were many different devices being created, but they all generally fit into the category of “thing with a screen.”

A smartphone is a smaller tablet. A tablet is a laptop without a keyboard (unless you’re talking about Microsoft’s Surface), and a laptop is a portable desktop computer. All of these devices were made to basically function (other than inputs) in the same manner – and during this time, innovation was based around making devices smaller, and more portable.

Mp3 players were abandoned in favor of iPods. iPods were abandoned and replaced with iPhones or Android devices.

The first wearable devices, like the FitBit, were a continuation of this trend – take a screen, make it smaller, and put it on a device. There was one important distinction with this device, however – unlike smartphones, tablets, and laptops (which all accomplish the same tasks), the original FitBit only did two things – it kept track of your daily steps, and how much time you spent sleeping.

This was in 2009 – two years after the first iPhone was released, and during the time period mobile devices were focused on adding features, not purposely limiting them.

The power of wearables isn’t their ability to do everything, however – it’s their ability to do a small range of things very well. When it comes to keeping track of steps, wearing an unobtrusive device that you don’t need to interact with is a much better user experience than taking out a phone, opening an app, waiting for it to load, starting your step counter…

What’s less distracting when you go for a run – a smartphone bigger than your hand, or a device you can wear on your wrist?

So what does a watch that keeps track of your heartbeat, steps, and sleep cycle have to do with the future? It’s because this is just the beginning.

The wearable hardware market

Smartwatches and fitness trackers – the two types of devices that immediately come to mind when the subject of wearable tech is brought up.

For good reason to – the vast majority of wearable devices sold have been Apple’s AppleWatch, which sold 1 million units in one day on its initial launch in 2014. Since then, there’s been steady, incremental improvements to smartwatches, like battery life and screen resolution. When WatchOS 2.0 came out, and apps began to run natively on AppleWatches without the help of a companion smart phone, the benefit of smartwatches began to come apparent.

Wearable tech’s association with fitness isn’t unfounded either – the fitness and sport segment of the wearable market accounts for 39% of the market share. Speaking of market share – the wearable market, while new, isn’t small at all – in the U.S. alone, there were 38 million users of wearable tech by 2018.

The truly exciting aspect of these numbers is their potential – with AR-specific products already on their way to market this year, like Microsoft’s HoloLens2, the growth and innovation the wearables market will experience will most likely be staggering – in both economic growth, and impact on society. In the U.S. market, 21% of consumers have stated they are “very likely” to purchase a piece of wearable tech like a smartwatch. With AR, VR, and MxR on the horizon, this statistic will only increase.

Just take a look at this piece from TIME about the future of wearable tech – smart clothes that provide tactile feedback paired with GPS navigation, shoes that charge your other wearable devices by utilizing the energy from your movements, and GPS enabled shirt buttons that can call 911 when you’re in danger.

The wearable software market

There are three main industries focused on expanding their markets via wearable devices:

  • Fitness and Wellness
  • Healthcare
  • Defense

Both the fitness and healthcare industries are expanding into wearables for obvious reasons – defense contractors and the DOD, however, are more interested in the application of VR and AR technology.

The healthcare industry is expected to monitor the health of an estimated 5 million patients by 2023, driving $60 billion in spending on wearable tech. The Department of Defense is expected to spend nearly $11 billion on VR wearable tech by 2022 – while that’s a hefty price tag, the amount of time and money saved in training soldiers is a much higher number.

While wearable tech will most likely never fully replace smartphones and laptops, they will undoubtably enhance the experiences they provide to users. That’s why it’s important to make sure the pain point your wearable app solves is even more targeted than a standard mobile app.

Despite many pieces of wearable tech providing the hardware layer for native, standalone apps that run independently without the help of the cloud or another piece of technology, most apps that live on wearables (especially smartwatches) are supplemental additions to an already existing app.

So, how much does it cost to implement wearables?

Luckily, developing a wearable app isn’t much different than developing for iOS or Android – there’s just a few tweaks here and there. AppleWatch apps are programmed using Xcode and Swift, just like all iOS apps, and Android Wear apps are programmed using the usual suspects – JAVA and C++.

Let’s pretend that we were going to make a wearable app for Brew Trader – it’s an app that gives users the ability to find and trade craft beer with other beer enthusiasts nearby, which they can find on a map, or through searching for a specific beer.

Let’s say the wearable app we’re developing is going to be used to supplement the process of communicating with other users – currently, users are sent a notification when they have a trade request. In order to optimize the interpersonal communication between users, and lessen the time a request spends in limbo, we decided to build out a wearable app that alerts the user about any trade requests, or responses to their own requests.

What would this require?

First, we would need to build out the UI for the wearable app – the parameters of which rely on a set of factors such as the screen shape (for smartwatches: rectangular, or circular) and model of wearable device (AppleWatch vs. Android Wear). If we wanted Brew Trader to be available for both Apple’s and Android’s wearable devices, we’d need to develop native apps for both.

The interfaces of smartwatches use different inputs and design hierarchy than mobile apps, so while it’s important to keep the styles of your app similar, it’s just as important to not reuse UI elements – you’ll end up going back to re-design them anyway.

Second, we’d connect the wearable app to the mobile app using the cloud, as well as connecting the wearable app itself to the backend database Brew Trader uses to keep track of trade requests, user profiles, and user DMs.

Third, we’d use an analytics platform like Kumulos to create segmented push notifications that alert users to trade requests, responses, and DMs.

Fourth, we’d implement the new code into Brew Trader’s code base, and add the new smartwatch functionality as an update to the already existing app.

And when it comes to implementing a wearable app into an already existing app, that’s really all there is to it. Something that’s very much worth noting – if the only thing you want to achieve by implementing a wearable app into your already existent app are push notifications (and the push notifications don’t rely on data from the mobile version), there’s virtually no extra cost. All smartwatches can display the push notifications of an app, regardless if it’s a mobile or wearable app in question.

If you want to build a wearable app from the ground up, it’ll largely be the same cost and process as normally developing a mobile app. One thing we will recommend here is to directly contact the company that designs the hardware you’re planning to develop for. The wearable industry is still very plastic, so UI/UX standards aren’t set in stone, and users are still very willing to learn new ways to interact with wearable devices. As a developer, you can actually influence the development of hardware to include physical features or processing capabilities your app would need to function. This isn’t an opportunity developers have very often, and the window to do so will soon be coming to a close.

Stories from the office – subverted expectations

When I got into work this morning, right after the first two sips of coffee, I saw an inspirational video posted by one of my LinkedIn contacts. It was a challenge he sent out – to make today the most productive we can.

I had been on a productivity hot streak – I had written and posted eight blogs in seven business days, and I was ready to blast out another piece today. After seeing the LinkedIn video, I challenged myself to write two.

Unfortunately (fortunate for the tendons in my wrist, however), the hot streak came to a close.

Our CEO is a big believer in letting us carve our own path, discover the dead ends, and learn from them. There’s never been any pressure to not make a mistake – the expectation isn’t perfection, but rather the ability to pivot quickly and make the most from (and fix) said mistake.

Mistake #1

Not talking to any devs about the content wheels the content department came up with.

Believe it or not (but it’s very believable), before I started with NS804 I had about as little knowledge about app development as possible. The first smartphone I ever got was a hand-me-down iPhone 5c in 2015. I still use it – all five available gigabytes.

I’m pretty okay at learning new things, however, which is the reason I’m here. I’ve learned a lot in these past eight months, and I hadn’t hit a snag since January when I first tried to wrap my head around writing a layperson’s guide to Android development. I’ve gotten to that point where if a developer is talking about what they’re working on, I can glean about 70% of what they’re getting at – it’s like when you can understand the words of another language when it’s spoken to you, but you can’t form them in your head to respond. In my case, it usually means I spend about 70% of the conversation nodding my head up and down, because that’s the universal way to communicate “I understood what you said, I just have nothing important to add.”

So anyway, the title of the story I planned to write today was this: “How to migrate your users when updating your app.”

If you’re a developer, you most likely just blinked from the… ridiculousness of that title.

You see, I’m a writer, not a developer. I have a degree in creative advertising, not computer science or information technology. The last marketing department I worked in was for a reclaimed wood shop.

But don’t worry – our blogs and guides aren’t pulled out of a hat and vetted by someone who doesn’t have enough technical knowledge to understand when they’re on a wild goose chase (like the situation I’m currently writing about). There’s our dev’s expert review backing our content.

Mistake #2

“If you can’t find it on Google, it might be because the thing you’re looking for doesn’t actually exist.” – Future Kate, hindsight-ing past Kate.

I mean, yes, there are better resources out there, like Stack Overflow or Exchange for the answers to detailed or technical questions. But when you’re writing a piece that needs to be understood by everyone, it’s better to start with resources that were meant to be consumed by non-tech people. You know, don’t reinvent the wheel, work smarter, not harder sort of deal.

All that I could find were how-to’s on migrating your app to the cloud – all well and good, but it wasn’t what I was looking for. I’m not one who gives up all that easily, however, so I kept refining my queries, digging deeper.

For a while I was a little excited by the thought of writing a blog on a subject no one had touched yet – the fabled nascent piece of content. Now, if you are a developer, you might be shaking your head at your screen right now, thinking to yourself, “yeah, you couldn’t find anything because it’s a literal non-issue.”

But, dear developer, to someone who has worked on re-branding campaigns, it was a natural, completely rational subject to tackle.

The funny part is that I totally understood you could update an app’s code base with anything. Sure, if it’s on the App Store, you need to get your update approved by Apple first, but you can switch out a build that was made in React Native with true Native, or vice versa.

Unfortunately for my productivity, I had to be bashed in the face with this information before it really sunk in.

I finally found the answer as to why I couldn’t find any pertinent info about user migration on Google – from, you guessed it, Stack Exchange:

stackexchange

“Oh,” I found myself thinking. “Duh.”

Just to be sure, I walked down the hall to our senior Swift dev’s cubicle. She was talking to our CEO, who was sitting on the comfy red couch we like to gather around, their conversation about some company growth we’ve experienced recently.

“Sorry for interrupting,” I began. “but I have a question…”

We shared a laugh, them laughing at the situation, me laughing at my own expense. If you can’t laugh at yourself, you’ll never laugh again, after all.

They quickly responded with the exact reasons listed in the Stack Exchange answer, while I nodded along.

As if the universe wanted to ensure that user migration was a non-issue, our CEO reminded me of another fact – DIY app builders like Appy Pie (again, I don’t hate you Appy Pie) retain the rights to the entirety of the code of your app – so if you outgrow their services and want to make a new app, you’re starting from scratch anyway. Because the law.

Luckily, the best part about a content wheel is you have the next six months of your professional life planned out, so I told our CEO I’d just move on to the next blog topic we had strategized on.

“Write something about this,” he said.