How much does it cost to make an app like Uber?
How much does it cost to make an app like Uber? The cost of app development (no matter if you’re building a game, fitness, or social app) comes down to three distinct factors: feature set, scale, and hourly rate.
Every app’s feature set is a combination of different features that provide a cohesive user experience; while the code that makes these features work is technically the same whether one user is engaging with the app, or 100 users are, the scale of an app has significant costs on your backend and server maintenance costs – not to mention API calls and other data transfer costs.
While your app’s feature set will make up the majority of your initial development costs, scalability and maintenance will easily overshadow these investment costs over the course of your app’s lifecycle.
For an app like Uber, which boasts 80 million users spread across 77 countries, scalability is literally a huge issue – so much so that Uber employs 2000 engineers – a full third of their total employees.
This isn’t to say all of an app’s reoccurring costs come from backend management – the app marketplace demands continuous improvements to an app’s UX and UI – meaning designers are needed to improve upon existing features and ideate new ones, and engineers are needed to code these updates.
In short, development for an app like Uber is never done. For as long as that app is available on the App Store or Google Play, there will be reoccurring costs. With these costs, however, come profits; the more time and effort is put into improving your app’s UX (design and feature set), the higher these profits will usually be.
Uber’s feature set
Uber makes use of the following features to provide a working app:
Geolocation
Geolocation is used to provide both riders and drivers with real-time locations of each other.
GPS/Navigation
GPS/Navigation is used to provide drivers with optimal routes.
Push Notifications
Push notifications are used to provide riders with updates about their ride, or other info when the user isn’t engaging with app directly.
In-app Messaging
In-app messages are used to provide riders with updates about their ride when the user is currently engaged with the app.
Payments
Payment services give users the ability to pay their driver directly though the app using a credit or debit card, as well as promotional codes.
Register/Log-in
Most apps utilize some sort of log-in feature via email or social media account.
Messaging
Not to be confused with in-app messaging, this feature gives drivers and riders the ability to directly message each other.
Price estimate calculator
By using data from the GPS/Navigation feature, the app provides riders with a pre-estimate of how much their ride will cost – this is influenced distance, time of day, and location.
Ratings and reviews
Users are able to leave ratings and reviews for drivers that are aggregated in a database that can be remotely accessed by other users.
UI
The UI is the layer of the app the riders and drivers interact with – for Uber riders, this is mainly used for booking rides and paying drivers, and for Uber drivers, it is mainly used to accept riders and follow routes.
If we were to add up the costs of developing these features, and not include the costs associated with maintaining those features, the initial costs would total anywhere between $100,000 – $300,000 depending on the hourly rate of the development team in question.
This might seem like a heavy upfront investment, but consider the potential for revenue available to you – Uber’s revenue was $11.27 billion in 2018.
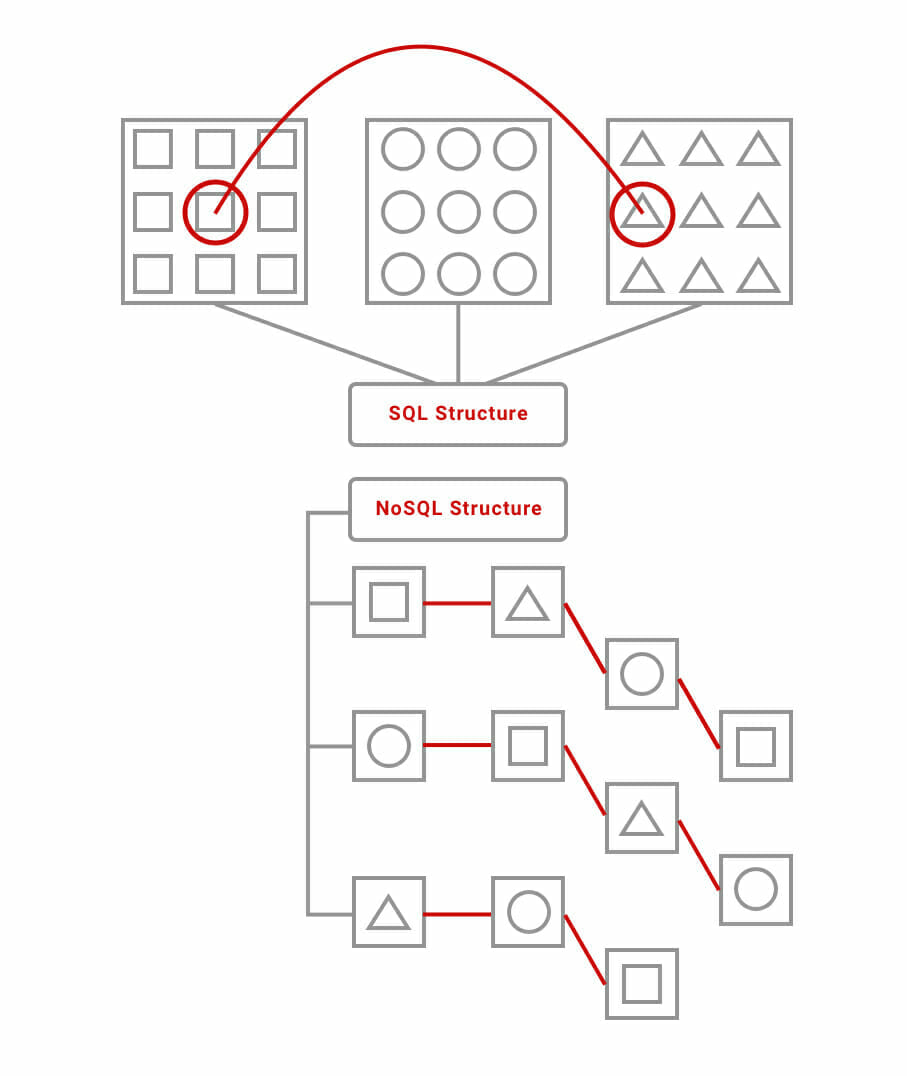
Uber’s tech stack
Virtually every app (other than an extremely simple app) utilizes both a front and back end – and Uber is no exception. Much like an iceberg, Uber’s front end, while making up the layer users see, is dwarfed by its hidden-from-view back end.
While all of Uber’s backend functionality can be achieved through API integration, a backend is still required to provide the logic for the API calls. For an app at the scale of Uber, however, heavy reliance on third-party APIs can bring about exponential additional costs; GPS and mapping APIs, for instance, base their pricing on the number of API calls made – which when paired with the real-time updating that Uber utilizes, creates a significant operating cost.
Third party API integration, while expensive, can still come out as the cheaper option when compared to building your own custom system – many backend systems rely on physical infrastructure to run. Continuing with the previous example, third party GPS and mapping APIs are plentiful for a reason – significant physical infrastructure is necessary to the operation of mapping systems – everything from servers to satellites.
In order for Uber to function on a daily basis, its core functionalities – geolocation, mapping, GPS, and payments – require a significant amount of data to transfer through the app’s servers. All of its features, other than its UI layer, require some sort of data transfer in order to function.
Due to this heavy reliance on servers, backend maintenance is paramount to Uber’s success.
Uber’s maintenance and updating costs
The costs of maintaining and updating an app comes down to the total collective salary of your software and hardware engineers, as well as your UI designers. It might seem unthinkable to employ 2000 engineers like Uber does – but there’s a very good reason for an app with the scale of Uber to do so.
As loading times increase, user retention plummets. The same goes for any hiccup in the UX of an app – if there’s an app that provides even a slightly better experience in one step of the entire process, users will gravitate towards it in favor of the slightly-less-optimized one.
While many of Uber’s engineers are undoubtably updating and maintaining the frontend of Uber, there are plenty also continuously working to improve and optimize the backend architecture of the app.
Even if a week’s worth of work for an entire development team results in the increase of data transfer speeds by one hundredth of a second, the impact is significant when millions of transfer requests are made every hour. Those hundredths of a second add up when multiplied by a million over and over again – and users will notice their load times decrease, bringing them more value.
If the salary of every engineer on your team is $100K, and you were to maintain an app like Uber, your yearly operational costs would be at least $200 million (this number is based purely on salary, and doesn’t include the operational costs associated with employing 2000 engineers).
These costs are necessary to an app like Uber, however – only the best apps stay on top. In fact, the average mobile user in the US will spend 90% of their time engaging with their personal top five apps.
Uber knows what keeps their app in users’ personal top five apps is the experience it provides – and this is why they spend so much money maintaining and updating their app. If their servers are unresponsive, or provide outdated data, users will move on to a different app without these issues. If their app doesn’t keep up design trends and new device screen resolutions, users will, again, abandon their app in favor of one that does.
Operational costs are forever
Just like diamonds (and plastic), the task of updating and maintaining your app is forever present – and so to will the associated costs continue on.
While the coding and design of your app’s feature set are one-time investments, keeping your backend running and your frontend up-to-snuff will constitute continual, regular costs, as they are necessary to maintaining and increasing your app’s user retention.