How much is a MVP app?

How much is a MVP app? Well, honestly, that’s a question with a few different answers, and all of them are open-ended.

If your question is in reference to how much of a feature set a MVP app includes, the answer is “all of it,” and you’re wondering about the spend of developing a MVP app, the answer is “it depends.”

MVP apps aren’t magical money-saving inventions, nor do they follow a strict development roadmap – there isn’t a uniform MVP app, just as there’s no set of rules for running a business. A MVP app, by definition, provides the minimum amount of features to be a viable product. So the answer to both of these pre-supposed questions is “as much as you want it to.”

MVPs and feature sets

First off, it’s important to fully define what a MVP is:

Minimum – the minimum set of features a product can have while still remaining…

Viable – to provide value to customers, so they are willing to engage with the…

Product – which is ready to be used for consumption.

Many people like to think MVP means “rushed” or that the product produced could be classified as a prototype. But a MVP app is neither of those things – what makes a MVP app a MVP app is the idea and the implementation of that idea, not the product itself.

MVP apps come with complete feature sets, as they must be ready for consumption on the market – and in fact, MVP apps usually need to perform their specific task better than any other app on the App Store or Google Play.

This is especially true when building a MVP app when competition already exists.

Now, keep in mind, that while a MVP app’s feature set must be complete, there is no such thing as a complete app. Updating your app is a continuous process that is necessary to the success (and survival) of your app. There is a correlation between frequently updating an app, and the revenue that app produces – the most successful apps today release an update one to four times every month.

This is why MVP apps lend themselves well to the app marketplace – software products are expected to update frequently anyway, so you might as well start with a basic, robust foundation that allows for easily planned, strategically implemented updates.

This is the true value a MVP app brings to both you and your users – when presented with a minimal feature set, users are able to request the features they want, and developers are able to implement these user-requested features without the hassle of working around other existent features.

A MVPs feature set should only work to solve the problem the app is designed to solve. Pain points are the most powerful aspect of your app – and any feature that doesn’t play a role in that solution should be removed.

For example, a rideshare app like Uber would only need a few of the features it currently makes use of to solve the transportation pain point it solves. A MVP rideshare app would make use of GPS and mapping, navigation, location services, a backend database to store user data, and a payment gateway like Stripe. This would all be organized in a simple UI.

All of the other features Uber makes use of are quality of life improvements – while they aren’t vital to the core functionality of the app, they do bring users extra value. Adding value to an app over time is a great way to retain users – they will continually return as they see the update notifications.

The cost of MVPs

Due to their reliance on a specific, targeted feature set, the development cost of a MVP app can vary wildly. Depending on what your MVP app is attempting to solve, your app could cost $25,000, or $100,000.

The equation to determine the development cost of any app is the one constant in app development: hourly rate, time, and scale. A MVPs limited feature set – by design – reduces two of these variables. While this does reduce the initial development cost of the app, the true value of a MVP app, as stated above, is the engagement you receive from your users.

This is why the money saved in the development stage should be put right back into building a community for your MVP app. The value a MVP brings is nonexistent if your app doesn’t have a community built around it. As soon as you have an idea for an app on the table, and even before development starts, your first priority should be to find your market, and then engage with it in order to create a community.

For more about MVPs, market research, and pain points, check out our aptly-titled blog, MVP development: Market research and pain points.

The best way to reduce the cost of your MVP app (and this is true for the development of any application, software, or product in general) is to have a solid plan, and carefully execute that plan by properly managing your development cycles.

For more about MVPs and development cycles, check out MVP + Agile methodology.

In-app payments and purchasing – cost and profitability

There are many methods of app monetization, but none are as palatable for users – and profitable for publishers – as in-app payments and in-app purchasing. Just like any lucrative revenue stream, however, there are many costs (both hidden and upfront) associated with implementing the ability to charge users while they are engaging with your app; and there are even more pitfalls that may pop up during the development and implementation of in-app purchasing and payments.

Below, you’ll find knowledge about the deployment, cost, and revenue potential of in-app payments and purchasing:

The difference between in-app purchases and in-app payments

There’s a lot of different ways for users to spend money in apps, and a plethora of platforms that facilitate payments. In-app purchases are distinguishable from in-app payments because they are used in situations where the user isn’t buying a product, but rather additional content for the app itself.

In-app payments refer to purchases made through an app – the most common example being eCommerce apps, or even retail apps like those for Target or Kroger. Both of these methods involve the user paying for a good or service – but both are implemented (technologically, and strategically) using different methods, and come with different associated costs, as well as revenue models.

Let’s look deeper into these two revenue-driving options:

In-app purchases

In-app purchases can be broken down into four categories:

  1. Consumables: These are (usually) single pieces of content that are purchased once, depleted, and then purchased again. The most obvious example of a consumable purchase in an app would be lives, gems, or coins that many mobile games use as in-game currency. Another example of consumable purchases that is outside of the gaming sphere, however, is Tinder’s option to buy more swipes. Consumable purchases don’t just belong in games – if your consumable purchase can provide enough value, users will purchase it.
  2. Non-Consumable: These are, not surprisingly, the direct opposite of consumable purchases. Once bought, these extra pieces of content, additional features, or extra services will never expire. A good example are filters in Instagram, or sticker packets in WhatsApp.
  3. Auto-Renewing Subscriptions: Using this model of in-app purchasing, users buy access to services that regularly provide content updates, like Hulu. Other subscription services offer more utilitarian products, like cloud storage services such as dropbox, or productivity software like Monday. Users will be charged on a regular basis using this model.
  4. Non-Renewing Subscriptions: Users will purchase access to services or content just like auto-renewing subscriptions – this method differs in one key factor however: content is not regularly updated, and the user is only charged once for the content or service, and not on a reoccurring basis. The most prevalent example of this would be the omni-present “season pass.” In order to access these services or content, users must pay for every release.

Note: For apps published to Apple’s App Store to make use of in-app purchasing (and payments), publishers must sign Apple’s Paid Applications Agreement, as well as set up their company’s baking and tax information with Apple.

There are two options when it comes to in-app purchasing APIs: StoreKit for iOS, and In-App Billing API for Android (always with the clever names, Android). These options are the only two available for implementing in-app purchasing through Apple and Google’s platforms, and both (just like the sale of any product or content through the App Store or Google Play) will take 30% of the profit from each in-app sale made through your app.

This form of app monetization is, so far, incredibly successful, if implemented respectfully and properly. According to a study conducted by App Annie, out of 1,200 developers, 50% of them used in-app purchases to drive their revenue, and the App Store’s top revenue-earning app of 2018, the game Fortnite, made $450 million that year – using a revenue model mainly based around in-app purchases of character costumes.

In-app payments

This is where your field of developmental and payment options begin to widen – the purchasing of goods, services, and content outside of the App Store or Google Play can be implemented through many different APIs, and the strategy behind the CTA changes based on the individual app.

On of the most popular apps to make use of in-app payments is Uber – riders need a way to pay drivers, and drivers need a way to receive payments. In the same manner as Apple and Android with in-app purchases, Uber takes a percentage of the profits from each transaction between riders and drivers.

This revenue model is also highly successful – Uber’s revenue in 2018 was $11.27 billion.

In-app payments are also the backbone of mobile eCommerce – an industry that boasted 500 billion individual sales in 2018.

While you can develop your own custom in-app payment processing system, there are APIs out there that can speed up development: two popular options being Stripe and Braintree. Both of these APIs provide end-to-end encryption, and charge a percentage for each credit or debit card transaction. Stripe charges 2.9% + $0.20 for non-European cards, and Braintree charges 2.9% + $0.20 as well.

In the near future, we’ll cover these (and more) in-app payment APIs in greater detail – so stay tuned for a deep dive into payment gateway APIs.

When implemented, and not imposed, in-app purchasing and payments are an un-stoppable revenue stream

The key to both in-app purchases and payments is to be honest, clear, and provide value. Remember – anyone can play Fortnite for free, and yet it made $450 million last year. While the in-app purchases in the form of costumes weren’t necessary to the gameplay, users were more than happy to purchase them. When users don’t feel pressured to pay for extra content or services, but are rather presented with the option, they are more likely to pay, and continue engaging with your app.

Onshore vs. offshore: Cost vs. value

We live in a truly global age – theoretically, there’s nothing stopping you from picking up your phone and video chatting someone in Nepal, other than the fact that you probably don’t have a contact that lives in Nepal (or, if you’re reading this from Nepal, video chatting with someone in Paris, Texas).

If you’re reading this from the US, there’s a few good reasons you don’t have a contact who lives in Nepal (unless you do have a contact who lives in Nepal): time, distance, and language. It’s pretty difficult to create a relationship with someone who’s asleep when you’re awake, lives 6,000 miles away, and doesn’t speak the same language as you.

As this piece published by Medium states, offshore software development can potentially be four times cheaper than software built in the US or Europe, but for the reasons listed above – and more which we’ll cover below – when put into practice, offshore development usually ends up costing you more money.

Why? As we’ve written about before, the cost of app development (and any form of software development, in fact) comes down to the following equation: feature set + scale + hourly rate = total development cost.

Yes, hourly rate is one of the major determining factors to the cost of development, and yes, offshore development tends to be cheaper than onshore – but, so too are feature set and scale included in the equation. Development of an app’s feature set requires significant communication between developers and clients, and as distance increases, so to does your operating scale.

Distance = time

Unsurprisingly, the majority of differences between onshore and offshore development arise from distance more than anything else – even if both parties are speaking the same native language, a choppy wi-fi signal, when transmitted internationally, can cause major disruption to communication comprehension. This problem is of course compounded when accounting for language barriers.

There’s more to distance than its purely physical definition – cultural distance is a major disruptor to the time it takes to develop an app. UI design is a language unto itself, and depending on what culture your designer is from, you many not be supplied with a UI that fits the tastes of your target market.

Take, for instance, this app made for the Brazilian market. For many users in less-digitally-developed countries, smartphones are their only method of accessing the internet. Therefore, apps are designed to do as many things as possible, and utilize bright color palettes to convey feeling rather than responsiveness and tight animations that exemplify onshore UI design.

This does mean, however, that when creating an app that is to be used across multiple countries and cultures, it’s best to find designers from each region to create region-specific layouts, in order to best attract your individual niche markets.

Finally, as we previously mentioned above, there is always the logistical aspect of developing an app with someone half-a-world away. Questions about current build iterations usually come up at the beginning of the day, not the end – which when working with a team on a 12-hour time delay, can equate to a full day of work lost for that particular developer.

If a developer has a question at the start of their day for you, and your day doesn’t start for another twelve, there’s no way for that developer to progress – full-day-delays can lead to adding an entire extra week onto your development timeline over the course of a project measured in weeks; and for projects measured in months, entire extra seasons can be added onto your turn-around time.

Communication

An iOS app developed in India is written using the same language as one developed in the US. Software languages don’t change depending on the developer’s geographical location – but documentation does.

Clear documentation is absolutely necessary to a successful software handoff – if you’re a company with your own internal IT department, you might be forced to spend significant amounts of time either reading tens of thousands of lines of code, or talking to your offshore development team for clarification.

Improper documentation doesn’t just cause problems during development – it causes deployment issues during updates as well. It’s smart to estimate your time spent communicating with your offshore team will take four times as long as it would when compared to an on-shore team, when accounting for delays caused by language barriers and timezone differences.

Logistics

Working closely with an offshore developer can create nightmarish amounts of red tape. Scheduling a meeting with an offshore developer can mean paying for multiple international tickets, hotel expenses, meals, visas, and much more. It shouldn’t cost your company thousands of dollars to hold one face-to-face client meeting.

There’s a reason in-person meetings are so important – meeting with a potential business partner in real life is the best way to determine whether or not you should place your trust in them. Placing your trust in a company that has no personal connection to you can lead to some severe repercussions, especially when paired with the more lax security and privacy laws offshore developers are subjected to.

IPs are also less protected when developed offshore, and if your intellectual property is stolen, your international legal fees can add substantial bloat to your operational budget.

Everyone knows the old saying “you get what you pay for,” and in regards to offshore vs. onshore development, this adage still rings true. Domestic developers have more of a stake in maintaining their reputation with clients, as offshore developers have the ability to move from project to project without repercussion – meaning the quality of your app’s code can suffer over time as it deteriorates from lack of updates.

With a domestic developer, you’re much more likely to receive an upgradable, adaptable, and understandable codebase for your app – don’t sacrifice long-term stability for short term profits.

How do I build my first app?

Are you getting ready to make your first app, but you aren’t sure where to begin? Well, don’t worry – we’ve gone ahead and made you your very own app development roadmap!

With a little bit of planning, some market research, and practicing the implementation of a few marketing fundamentals, you’ll be well on your way to launching a successful app. Unless you plan on actually coding the app yourself, your developer will be there to help you along your app creation journey.

If you want to teach yourself how to code an app, our Swift and Android development guides are a great place to start. If you’re planning on making a code-less app, here are three blogs that go over the reasons why we believe native app development will always be your best option when it comes to making an app:

Step 1: Your pain point

Ideation is the first step in your app’s development – just like any product. All apps are designed around solving a pain point – it’s why users engage with apps – Face App answers the important questions like “what will I look like when I’m old?,” Waze helps you dodge traffic, and Instagram makes every shot look like a pro took it.

Something important to note is that your app’s pain point doesn’t need to be unique – all games solve the same problem: boredom. Your app can even solve the problem using largely the same feature set as a competing app – it really only has to do one thing differently to make an impact on the App Store of Google Play.

If your app’s pain point is in line with another already existent app, download your competitor and use it a few times – research and pay attention to how the app interacts with its users, and take note of what could be changed. Next week, we’ll be going into a lot more detail on how to develop a MVP app when your competition already has a grip on the market, so stay on the look out!

If your app isn’t facing any competition, make sure to conduct as much market research as you can – it’s important to tailor your research to the purpose of your app, however. For a detailed guide on the methodology behind conducting market research for your app, check out our MVP development: Market research and pain points blog.

Step 2: Your design

When on the topic of apps, the word “design” can refer to a lot of different aspects of app development. The first part of an app that needs to be designed is your main user story. A user story can be thought of as the steps a user takes when interacting with your app.

User stories can look very different depending on the nature of your app. A workout tracker app will see lots of downtime in between periods of quick interactions from the user over the course of their workout – a gaming app will see continuous interaction for the duration of their session.

User stories are important because they give you a roadmap for how to design the UI (user interface) of your app. A lot of questions can be answered by determining your main user story – that being the most likely situation users will be in when engaging with your app.

So, if you’re making a workout app, you’d want to stick with bold, energetic colors, big buttons, and easy-to-read, quick messages. If you were making a game, while you’d most likely still work with bold colors, you’d want to include a wider range and variance of colors, your UI will be more complicated to facilitate your app’s gameplay mechanics, and messages can afford to be a little longer (not too much though – apps are about quick feedback and interaction).

Other things to keep in mind when designing your app’s UI: the most likely time of day (or night) users will be interacting with your app, where they’ll be (out and about, or sitting down), the mood they can be expected to be in, and whether or not they’ll have access to wifi (some features require a lot of data to be transferred between the user’s device and a server).

If you’d like more tips on designing an app, as well as ideas for designing an app that will keep up with users’ expectations in 2019, check out these two blogs:

After you’ve sketched out a few screens of your app, and have a little bit of an understanding of how users would interact with it, it’s time to find a developer. When searching for a developer, always start with Clutch or The Manifest, or other software development sites like DesignRush. Sites like these collect reviews of developers from past clients, and provide rankings based on their portfolio, ability to deliver, and other metrics.

This will help you narrow down your search. There’s a lot that goes in to finding and building a relationship with your developer. For more tips and info, check out our blogs on the topic:

From here, the developer you’ve partnered with will begin designing the finalized versions of your app’s frontend and backend. The frontend of your app is the UI, and is what users interact with – the backend is the logic of your app.

Backends provide the architecture that keeps your app functioning – this is where your app’s APIs (Application Programming Interface) will connect with your app’s code to provide extra functionality. An example of an API is Google Maps, or the “log in with Facebook” button some apps use – APIs can be thought of as building blocks that speed up the development of your app.

APIs are a handy tool because they (usually) do their task extremely well, and will add to the overall UX (user experience) of your app because of their robustness and expertise at what they do. You do need to be careful when selecting which APIs your app will utilize, however – there are security risks and ethical violations that can come from implementing a bad API.

The backend also encompasses the nodes in your app that connect to databases that are stored in servers – storing data in remote servers means your app takes up less storage space on your users’ devices, and it loads faster – all key factors in helping to grow and maintain your app’s user retention.

Before you settle on how your app will be designed, you need to decide which platform (iOS or Android) will be best for your app. For more information on choosing between iOS or Android, check out these blogs:

Step 3: ASO and launch

ASO – or App Store Optimization, is the process of building your app’s rank in the App Store or Google Play by strengthening these key metrics:

  • User Acquisition
  • User Retention
  • User Engagement
  • User Ratings
  • User Reviews
  • Keywords

After putting all of these metrics through a formula, your app will be ranked on the App Store and Google Play. Your app’s ranking is incredibly important – when users on the App Store or Google Play search the app store using the phrase “workout app,” the keywords you’ve selected, and the metrics created by your user data, will determine where on the list of workout apps your’s will show.

This is why keyword selection is a finely-tuned process – try to rank for keywords that are too competitive, and your app (when it’s starting out, at least) might not be able to handle the heat. Ignore popular searches and your app might miss out on a huge number of conversions. For more about ASO, check out our ASO: 101 blog.

After selecting your keywords, and collecting all the media your app will need for its page on the App Store, Google Play, or both, (that being your app’s icon, promotional text, screenshots, a promotional video), you’ll want to submit your app for review. Apple’s review process is much more stringent than Google’s, and both have one-time publication fees, and take 30% of each purchase. The App Store has a yearly fee for hosting your app as well.

Once your app is launched, you’ll want to use your standard marketing channels, and social media to get the word out there – while apps do rely heavily on ASO for growth, traditional marketing campaigns still have there place.

After launch, pay attention to user reviews and ratings, and make sure to hook your app up to an analytics service like Kumulos. These allow you to analyze detailed reports on user data, giving you the ability to find trouble spots so you can maximize your app’s user retention.

Finally, it’s time to start all over again – apps require frequent updates to stay competitive.

There’s no magic formula

Mobile app development isn’t much different from any type of software development – it can just seem daunting because it’s still relatively new. But with the right developer and idea, your app stands a good chance at being a success.

How to build a MVP iOS app

Building an app is never a simple process – but there are steps you can take to make your app’s development as smooth as possible. In a follow up to our Which is the better platform for a MVP? blog, we’re going to go step-by-step through the development of a MVP iOS app – from ideation, through development and testing, and onto publishing, launch, and post-launch development.

If you’d like a refresher on MVP development, check out our blog post on Clutch.

But first…

We need to reiterate why we’re specifically going over iOS MVP app development, and not Android. While there’s a lot of reasons as to why iOS is the ideal platform for a MVP, there’s one aspect that we will be covering in detail throughout this blog – user engagement:

  • iOS users engage apps for nearly twice as long as their Android counterparts
  • iOS apps have a higher retention rate than Android apps
  • iOS users download more purchasable apps than Android users and spend more money on in-app purchases:

  • Gaming app average revenue per user: $1.99 (iOS) versus $1.56 (Android)
  • Shopping app average revenue per user: $19.64 (iOS) versus $11.49 (Android)
  • Travel app average revenue per user: $32.29 (iOS) versus $20.47 (Android)

It’s stats like these that make up a market better suited for a MVP – not to mention the faster development and testing time for iOS apps, which compliments (as well as keeps up with) the already quick development cycle that makes a MVP a MVP.

The steps to (quick) iOS development

It’s important to note that there is no shortcut to development – if you want to make a good app, at least. The trick to achieving the speed of development that an MVP is known for is to build an app that works with as little features as possible.

To a service-minded company or appreneur, this can sound counter-productive, or even go against mission statements that boil down to “providing the best service possible.”

But a MVPs end goal isn’t to remain as a minimum viable product – once a MVP has had a successful launch on the App Store, the development cycle continues in the form of updating the code base of your app to include more features.

The efficiency of a MVP comes from those aforementioned iOS user metrics; user engagement, in the form of constructive criticism and requests, will serve as your market research and your app’s beta test. This is one of the deciding factors in the lower cost of developing a MVP app – that, and the shorter amount of time actually spent in development and testing.

Let’s look a little deeper into things.

Step 1: MVP ideation

All apps should stick to features sets that help solve their pain point – but a MVP, by definition, must so. A simple way to make sure your app is only utilizing features that play a role in solving your pain point is to write a list of everything you want your app to do.

Then, take your idea and start trimming the fat – let’s take a look at an example:

Let’s pretend that it’s a few years back, and we’re currently in the process of ideation for Brew Trader. Brew Trader is an app that connects craft beer enthusiasts by providing them with a platform that serves as a medium through which to trade craft brews with others in their area.

So, we write out a list of everything we want it to do:

  • A map that shows the locations of bottles up for trade, and is updated continuously so users can see the latest offers, as well as the ability to move the locations of trade beacons
  • A user profile that contains information the user wishes to share, as well as the user’s entire collection of craft brews
  • A messenger so users can DM each other
  • A trade history so users can find other users based on past interactions
  • A bar-code scanner to populate information about bottles available for trade

Then, we edit that list down to what Brew Trader needs in order to function properly:

    A map that shows the locations of bottles up for trade, and is updated every 10 minutes so users can see up-to-date offers

  • A user profile that shows their bottles available for trade
  • A messenger so users can DM each other (while a significant feature set, this is necessary, so users are able to communicate meet-up times and locations)

All in all, that boils down to three different screens, which are built out in the next step.

Step 2: MVP UI/UX

Let’s take those three feature sets and break them down into the visual elements that will make up Brew Trader’s UI. First of all, just like 99% of iOS apps, we’re going to need a bottom menu navigation bar.

This is utilized in UI design so a user can quickly switch between the screens that contain the feature sets listed above. This bar will contain three icons, which will each signify one of the three screens – those being the map screen, the user profile screen, and the messenger.

The next thing to do is layout your different screens.

The map will be hooked up to a mapping API, such as Google Maps. Google Maps is free, as long as your app is free. If you’re looking for other options, check out our blog about how much it costs to implement a GPS & mapping API.

The next element of the map screen to design would be the trade beacons, as well as the sub view that would pop up when selecting a beacon – this sub view would present the name of the bottle up for trade, as well as the user whom it belongs to.

The next screen to design is the user profile section. For a MVP, this should be done in the simplest way possible – a section to add a thumbnail profile photo, and fields to add and view bottles that are up for trade.

The final screen, the messenger, can utilize a messaging API – many of these can be tweaked to match your app’s branding and color schemes.

That’s all you need to design if your making a MVP. Next in line is…

Step 3: Coding a MVP

iOS apps are built using Swift, which uses the following components to create an app’s architecture:

View Controller – Think of this as the frame of a painting. The view controller, which is aptly named, controls what you see on the screen of your mobile device.

View – Within the view controller is the view. Think of this as the canvas of a painting – the view makes up the sum of all visual aspects of the app. Each screen of an app is a different view.

Subview – Subviews are the individual sections that collectively make up the view. Think of a subview as specific sections of a painting, such as how the subject matter is distinguishable from the background. More specifically, a subview would be the keyboard section of iMessage, or the section where text messages display.

Buttons – Buttons are… well, buttons. Within subviews, buttons are the interactive elements of apps. Think of the individual letters of the keyboard section of iMessage.

Images – Also within subviews, images are used to display specific pieces of visual information, and range from photos to logos and icons. An image can function as a button.

When it comes to coding, there really isn’t any difference between programing a MVP, versus programming a fully-fledged app. The shorter development time of a MVP comes from the smaller number of features to implement, which means less UI to build out, and less backend logic to program.

If you’re looking for tips on how to avoid costly mistakes, check out our blog on app development pitfalls.

Step 4: MVP testing

While one of the upsides of a MVP is your early adopters serving as your beta test, you still do need to test your app before you send it off to the App Store. This is especially true for iOS apps, as they face a rigorous review process before they are officially published on the App Store.

Not only will your app be rejected if it isn’t robust enough for Apple’s standards, a buggy app will only serve to weigh your growth efforts down. Users are more likely to abandon an app than stick with it.

Because of this, you must iron out the kinks of your app before it launches. For tips on conducting app testing, check out our blog on the topic.

Step 5: Publishing

After your app has been thoroughly tested, it’s time to send it off to Apple for review and approval.

In order to publish your app to the App Store, you must pay a annual fee of $99. If your app costs money to download, or goes by a subscription model, Apple will take 30% of each sale.

That’s really all there is to publishing your MVP app – the publishing process doesn’t differ depending on what type of app you’re making. All apps on the App Store go through the same review process.

Step 6: Launch

Launching a MVP is largely the same as launching an other app, but there is one very important factor to note.

Users will make snap decision based on the first impression of your app. Users do, however, make exceptions for small hiccups if they are made aware of the possibility up front. The nature of a MVP app isn’t to be perfect, but rather to provide the best current solution to an unaddressed, or under-addressed pain point in your user’s lives.

In your App Store listing (which we’ll cover in detail below), you’ll want to include a section that explains three things:

  1. You understand that your app isn’t perfect, but you’re working on making it better
  2. Users can directly contact you to provide criticism or make requests for features
  3. Users can expect regular updates

Remember – users are more likely to delete your app from their phone than they are to keep it. This is why communication is important with your users – but doubly so with a MVP. Your users need to know from the start what they are downloading. They’ll be understanding if you’re upfront and transparent about your app. They’ll ignore, or even worse, spread bad word-of-mouth about your app if they are kept in the dark about what you’re doing.

Step 7: ASO

There are two fronts to your app’s ASO – User acquisition, and user retention. These can then be broken down into sub-categories:

User acquisition:

  • Keywords
  • The app’s build and compatibility
  • The app’s page on the App Store

User retention:

  • User reviews and ratings
  • Time users spend engaging with your app
  • In-app purchases (if applicable)

For a MVP, when it comes to a keyword campaign, focus on one main keyword, and derive from there until you have 5 keywords to work with. To continue with our example of Brew Trader, we’d use:

  • Beer
  • Beer Trade
  • Beer Swap
  • Beer App
  • Beer Finder

There’s a lot more to planning out and implementing a successful ASO campaign. For more information, visit our ASO: 101 blog post.

Step 8: MVP post-launch

This is the most important step of a MVPs development, as your execution here will determine the trajectory of your app’s future.

Start with both keeping track of analytics, and engaging with your users. Use every channel available to you to engage with your users – social media, push notifications, and responding to user reviews in the App Store itself.

For more information about tracking your app’s analytics, visit our guide to measuring your app’s success with Kumulos.

Next, you’ll want to start updating your app. In order to do this, start from step one – ideation. This time, however, use the requests and criticism, as well as your findings from your analytics to direct where you should be investing your time.

What are the steps to creating an app?

Do you want to create an app, but have no idea where to start? That’s okay! It’s actually not that complicated, as long as you have a roadmap to guide you.

Naturally, just like any idea or business venture, the first step is:

Ideation

Whether your idea comes from inspiration from your daily life, or from finding a need due to market research, or even because your business needs an app; the strength of an idea isn’t based off of color schemes, names, or packing in trending feature sets to impress investors.

It’s all about how well your app helps solve the pain point your intended users face. It doesn’t matter what your app does, or what type of app it is – your app’s value will be judged by the solution it provides.

Gaming apps solve boredom, fitness apps help solve either lack of motivation or help keep track of goals, navigation apps help users find their way, banking apps help users answer the important questions like “Do I have enough money in my checking account for this coffee?”

You get the idea.

At this point, don’t sweat the small stuff – don’t even worry about what your app will look like. Only focus on the solution it can provide, and the most logical and practical way to facilitate that solution.

Market research

If you didn’t initially start with this step, you’ll want to do it now. You don’t even need a prototype of your app by this point – all that you need is your idea. Take that idea, and bring it to your target market. Talk with them about what they want. Go to networking events, conventions, local businesses, check out blogs, google “your idea + problems,” and most importantly, research your competition.

There’s 2 million apps on the App Store, and 2.6 million on Google Play – mathematically, it’s pretty likely someone has built an app that at least touches on the basis of your idea.

Your job isn’t to come up with an original idea – it’s coming up with the most optimal solution to that idea. If you’re worried about originality, don’t be – Homer’s The Iliad and The Odyssey covered every narrative trope imaginable – writers today just come up with ways to repackage those ideas.

Uber wasn’t an original idea – people had been flagging down taxis for a hundred years by the time Uber came along. When you boil Uber down to its core idea, all that it is is replacing a hand wave with an app – everything else is secondary. Instagram didn’t invent filters, it just made it easier to use filters to make your photos look better.

When you’re researching your competition, pay close attention to three things:

  • The UI/UX
  • The features it uses to solve the problem
  • The app’s ASO

Take from those three things the aspects you do like, and keep them. Replace what you don’t like with your own spin on things. Then, come up with how you can create a unique package for your branding. Remember – your idea, and even the features used to facilitate your idea, don’t need to be original. If you’re making an app that requires GPS and mapping, you’re inevitably going to implement location services during development – coding languages (and the methods for building app functionalities) were designed to be systematic and logical – not unique.

One more important aspect concerning market research – this is when you’ll want to decide what platform(s) you’ll use to build your app. Knowing which platform you’re building for will dictate every following step in the process of creating an app – and if you are building both an Android and iOS app version, you’ll need two dedicated development teams.

More about deciding which platform is best for your app:

Gather your resources

For you, this means finalizing your concept and your market research, and then finding a developer. Once you’ve settled on a developer, it’s their responsibility to determine your app’s feature set and the SDKs and APIs it utilizes to achieve your desired functionality.

Your feature set will be based upon user stories. User stories are detailed, step-by-step use cases of what a user will do during a session in your app in order to accomplish solving your pain point.

This is when it’s time to start planning out the design of your app. Some dev shops have their own UI/UX designers, some don’t. If they don’t you’ll need to do it yourself, or find a freelance designer.

App design usually begins with wireframes and color options (usually starting with the home screen and moving on from there), as well as planning out the UX of the main functionalities your app provides. Think of the inverted pyramid – start with the overarching themes, and slowly work your way down to the nitty gritty details. If your app has graphics, this is the step you’ll implement those – anything visual that your app requires should be complete before coding begins (if your app requires heavy backend infrastructure, start building that out as soon as possible).

For more information about proper app design, visit our blog on covering the topic.

From these designs, you can build out a prototype, which is actually much easier than you’d expect, via help from different prototyping applications:

Once you’ve signed off on a prototype, your development team can get down to actually building your app. A good developer will be able to take your plan and run with it from here – they’ll obviously check in to provide you with updates, and to make sure you’re happy with what they’re producing, but they won’t be asking you technical questions – that’s why you hired them, after all.

Testing

This is a step that begins after the first lines of code of your app are implemented, and after that, testing never ends. It might sound disheartening, but that’s the nature of the beast.

To efficiently test, lay out every step of your user stories (which you and your development team came up with in the previous step) in a spreadsheet, and identify the features that aren’t working properly. Take the time to make sure your app feels smooth and attentive to inputs as well. Users are likely to abandon slow apps in favor of faster ones.

Record every bug you discover while testing. Fix the issues, and test again. Repeat this step until testing is complete.

Then, it’s time for testing round two… beta testing!

Beta testing will open up your app to a small segment of the public – one that you, or a marketing agency (or your developer) will find. The purpose of a beta test is to increase the likelihood of catching bugs due to increased entropy. Beta testers, while not as detail oriented as a dedicated internal testing team, will use your app in the way they expect it to work – not the use case you have imagined. You’ll find out during this step if the two align, and iron out the kinks if they don’t.

Beta tests are important for another reason – it opens up your app to more devices and usage environments. Your app needs to work the same in a cornfield as it does on the subway. The text and font you used in your app may be legible in an office environment, but the sun’s glare might make it difficult to read. These are the kinds of details beta testing will pick up on, and improve upon.

For more information and tips about running a beta test, visit our blog covering the topic.

ASO

Before you launch your app, you’ll want to plan out your ASO. There are two fronts to your ASO campaign: user acquisition, and user retention, in that order. These can be broken down into sub-categories:

User acquisition:

  • Keywords
  • The app’s build and compatibility
  • The app’s actual page on the App Store (you can think of this as your app’s storefront)

User retention:

  • User reviews and ratings
  • Time users actually engage with the app
  • In-app purchases (if applicable)

Keywords are the bread-and-butter of any ASO campaign. The App Store’s search option functions in largely the same manner as a search engine like Google: users input a phrase or word, and the App Store displays apps based upon relevance and ranking.

Keywords are the foundation from which to build your ASO efforts, and effectively implementing them is crucial to your app’s success on the App Store. The most important steps you can take to ensure your keywords are working for you is to:

  1. Know your competition and
  2. Start with 2-3 keywords (as your campaign matures, consider utilizing up to five main keywords)

For more information about ASO, visit our blog on the topic. For more information about keyword research, check out our guide on the topic.

Launch

Congratulations! You’re almost there. The next steps are publishing your app, which will mean different things depending on what platform you want to release on. Both the App Store and Google Play have different approval processes and standards for apps to pass before they can be published, as well as publishing fees.

Apple has strict guidelines that must be met for your app to be approved – Android does not.

To publish an App on the App Store, you must pay a yearly fee of $99, and Apple takes 30% of profits from downloads (that 30% is only applied to paid app and in-app purchases). In order to publish to Google Play, you must pay a one-time fee of $25, and Android also takes 30% of profits from paid an in-app purchases.

Update

As soon as your app is launched, you’ll want to start analyzing your user data. In order to do this, you’ll need to find an analytics platform. This is a very detailed and intricate process, so for accessibility, we won’t include that information on this particular blog – but you can find all the information you need about measuring analytics here.

Based off of your analytics, user reviews, and user ratings, you’ll want to start coming up with ideas for how to enhance your app. From here, you’ll begin again at step one: ideation.

How to build a mobile app: App lifecycle Management

App lifecycle management, which we’ll be referring to as ALM from now on, is the totality of managing the processes, systems, and people that make your app: market research, ideation, coding and design, testing, launch, analytics, and updating your app throughout its time on the App Store or Google Play.

Let’s explore ALM:

ALM

Step 1: Ideation

There’s two ways ideation can come about; from inspiration after being presented with a pain point in your own life, or from conducting market research which exposes a niche market with an unsolved pain point of their own. If it’s the former, make sure to conduct your own market research to determine just who exactly your niche is.

If you’re looking for ideas and methods for coming up with marketable apps, visit our blog on the topic.

Step 2: Requirements gathering

After solidifying your concept, you’ll want to develop out the requirements of your app – basically, what it does and how you want it to achieve those things. This covers everything from your app’s feature set to the SDKs and APIs it utilizes. Then, break those down sets and systems into individual, detailed tasks, so you and your PM can easily manage and track the progress of these tasks.

Your feature set will be based upon user stories. User stories are detailed, step-by-step use cases of what a user will do during a session in your app in order to accomplish solving your pain point.

You’ll also want to plan out which platform(s) your app will launch on, if you haven’t already. This should be partly influenced by your market research. Knowing which platform you’re building for will dictate every following step – and if you are building both an Android and iOS app version, you’ll need two dedicated development teams.

If you’re looking for more info about planning your app’s feature set, visit our blog covering the topic.

Step 3: Design

When you have a plan solidified for what your app will actually do, you can move onto design. Start with wireframes and color options on your home screen, and after settling on the right layout for your app, begin designing the other screens and how your users will actually interact with the functionality your app provides.

If your app has graphics, this is the step you’ll implement those – anything visual that your app requires should be complete before coding begins (if your app requires heavy backend infrastructure, start building that out as soon as possible). Make sure to build out a prototype so your software engineers have something to reference while they code.

For more information about proper app design methods, visit our blog covering the topic.

Step 4: Develop

This is where the actual coding begins. Your programmers should build the UI based on the prototype to ensure all of the requirements are met. Assign those requirements, incidents, and tasks to your team. For every incident that is completed, run tests to check for errors and vulnerabilities. After that iteration has passed a code review, add it on to your master branch.

For a lot more tips on avoiding development mistakes, visit our blog about common development pitfalls. For a guide covering iOS development, click here. For a guide on Android app development, click here.

Step 5: Testing

Create your test cases, which should be based on the user stories you came up with during step 2, requirements gathering. To efficiently test, lay out every step of your user stories in a spreadsheet, and identify the features that aren’t working properly. Take the time to make sure your app feels smooth and attentive to inputs as well. Users are likely to abandon slow apps in favor of faster ones.

Record every bug you discover while testing. Fix the issues, and test again. Repeat this step until testing is complete.

Step 6: Soft launch (quality assurance)

Sometimes referred to as a beta test, your soft launch will open up your app to a small segment of the public – one that you, or a marketing agency (or your developer) will find. They’ll use your app out in the field, so to speak. A soft launch can be thought of as the second step of testing, because it will inevitably uncover bugs and errors your first rounds of testing didn’t.

Optimally, you’ll have caught most of the bugs by this point, so your testers will have a high opinion about your app before it’s published (which gives you a significant boost to your app store rankings when they rate it after launch). They won’t be surprised, however, if they do find bugs – they understand that it’s a soft launch, after all.

You’ll bounce between steps five and six until all of your app’s bugs have been identified, fixed, and tested again. For more information and tips about running a beta test, visit our blog covering the topic.

Step 7: Deploy

Congratulations! It’s time to publish your app. Both the App Store and Google Play have different approval processes and standards for apps to pass before they can be published, as well as publishing fees.

If you’re looking for more information about the cost of publishing an app (and the other costs associated with development) visit our blog covering the topic. If you need help planning out your ASO campaign (which you should do before launch), visit our blog on the topic.

Step 8: Analytical review

Now it’s time to watch (and then react to) the data coming in. There are a lot of app analytics platforms, but we prefer Kumulos.

For a step-by-step, detailed guide to measuring your app’s success, visit our blog about measuring your app’s analytics.

For more information about coming up with ASO strategies, visit our blog on the topic.

Step 9: Enhancements

Based off of your analytics, it’s time to start updating your app with enhancements; enhancing your app’s UX by updating it’s design, security, and compatibility with other devices.

This is the step that glues the whole process together, and based upon the analytical data you’re receiving, you’ll ideate solutions for the aspects of your app that need to be enhanced.

The effects of not updating your app

Updating your app is the most important step you can take to ensure the time you spent developing your app (which in some cases can take years) doesn’t go to waste.

Updating your app is important for the following reasons:

App Trends

What’s cool is always changing, along with what’s possible. Updating how a feature looks or functions almost invariably results in a positive boost to your users’ experience using your app, which in turn leads to higher user retention, ratings, and reviews. Your update doesn’t always have to be centered around functionality either – sometimes it can be as simple as a background color change, which could be part of an A/B test you’re running.

Security

We all know there’s always someone looking for a vulnerability to exploit. Code that was once air-tight slowly loses it’s edge with time, and the longer your app goes without a security update, the more likely it is that someone with ill intentions will use that to their advantage.

This is an exceedingly important aspect to consider when updating your app. If a user is ever exposed to any security risk due to your app, they are virtually guaranteed to at least stop using your app, and are more likely to outright delete it from their device.

They’ll also be much more likely to give your app a bad review and rating, which can cause a huge dip in your conversion rates as your app plummets in its rankings on the App Store and Google Play. This can very quickly spiral into a downward trend that will be out of your control. Users who feel violated by your app will be sure to warn others about an app that is a security risk.

Bug Fixing

Even when you’ve tested your app throughly as outlined in the steps above, you’re bound to see bugs in your app over time. A major cause of these bugs popping up throughout the lifecycle of your app are due to new devices and updates to the OS your app runs on. As screen resolutions change, so to must your app – or at least, account for those changes.

In the same vein as security issues, bugs will also deter users from continuing to use your app. If you don’t care enough to update it, why should they care to use it?

Android development: What you need to know

Continuing from a previous installment of How to Build a Mobile App: The Ultimate Guide, we’re on to the next major player of the mobile market; Android!

If you own anything other than an iPhone, it most likely runs on the Android Platform. Mainly programmed using JAVA, Kotlin, and C++, Android boasted a global market share of 88% in 2018 (a growth of over 85% since 2009), and currently holds 36% of the US market. Just like our blog on iOS development, we’ll go over the information you need to know to make pragmatic decisions about Android development, and key terms to better communicate with developers.

Disclaimer: If you’re a developer or software engineer, there might not be any new information for you here. For a look into inventive strategies to boost your ASO, check out our featured piece on The Manifest.

If you’re a business owner, CTO, or marketing director, and you’re looking to hone your Android dev knowledge, or want to brush up on your developer jargon, you’ve come to the right place.

The Android platform has seen a meteoric rise in popularity since its inception – when Google Play first came on the scene in 2008 under the name “Android Market,” the platform was facing an uphill battle against tech giants Apple and Microsoft, who in 2009 both retained about 9% more market share than Android, which entered Q1 of 2009 with a market share of 1.6%, compared to the 88% it now holds globally.

Google Play now hosts over 2.6 million apps, and in 2016, Google Play announced users had downloaded over 65 billion apps in eight years.

The tools available to developers

Written using the programming languages JAVA, Kotlin, and C++ (among others), the Android Open Source Project (AOSP) is hosted on GitHub, and provides developers with access to 99 (and counting) open source repositories. A repository is like DropBox, but for code – it gives software developers remote access to different libraries of useful functionalities (which can also be called features). In the case of GitHub, these repositories are open and free to any member of the AOSP, but most developers will use their own private repositories as well.

A functionality is – in the simplest of terms – anything the app can accomplish. Does the app provide users with a map? That’s a feature. The map is GPS enabled? That’s another feature. The app provides users with next-step-directions in the form of push notifications when running in the background? That’s another feature.

If you’d like to learn more about feature sets and proper app ideation, check out our post on the topic.

Repositories are used to speed up the programming process by providing generic code structures that can be tweaked to fit an app’s specific branding and design.

A massive upside to Android development is its ease of access to software engineers – primarily due to JAVA acting as the flagship programming language when developing Android apps.

JAVA was first thought of in 1991, after all, and saw its first public release as JAVA 1.0 in 1996. As of 2016, it has been hailed as one of the most popular programming languages in use today, with 9 million developers reporting in, and is currently on its 11th version.

Kotlin, on the other hand, made its public debut in 2017, and is currently on version 1.3, which was released in October of 2018. Very new and relatively untested, Kotlin was designed to fully integrate with JAVA, and like JAVA, is an object-oriented language (meaning important information is stored in individual classes in the code itself), and seems to be a direct rebuttal to iOS’ Swift language. For an example of a class, check out our iOS development page.

With a new language emerging like Kotlin, it’s always fun to stay up to date on what’s coming down the pipeline; luckily, the Kotlin community makes it easy to stay in the loop.

Android developers, unlike those who work with iOS, have multiple compilers to choose from. A compiler is a program that software engineers use to write programs, and developers can choose from a number of compilers in which to write their code. For example, an Android developer could use Android Studio to write their code, or Intellij IDEA, or Eclipse (and many others).

The hierarchy of Android

There are four layers to the Android OS:

  1. Applications – This is where the native apps on your device, like your camera or text messenger, as well as any apps that have been download from Google Play, live in the OS. When an app is installed, it is stored in the aptly-named Application layer.
  2. Android Framework – This is layer that provides the tools developers use to make apps work – service functions live here: activity manager, package manager, NFC (near field communication) services, location services, windows manager, content providers, and view the system manager.
  3. Android Runtime – This is the layer that consists of the Android core libraries (the tools developers use to hook up JAVA with the Android OS), as well as the Dalvik Virtual Machine (DVM), a register-based virtual machine. For someone who speaks English, and not code, it’s basically a computer that lives in the OS itself, and ensures that the device the OS is on can run multiple instances simultaneously. Android Runtime is the foundation for the previous layer, Android Framework.
  4. Platform Libraries – Containing various C/C++ and JAVA libraries, this layer provides support for Android development. This layer contains functionalities like the media player, libraries for graphics, font support, and browser support – among many others (no one wants to read a list that long).
  5. Linux Kernel – This is the lizard brain of the Android OS. It manages drivers on the device, (think camera, audio, Bluetooth, memory), as well as memory management, power management, and other base-level management systems.

Those are the layers on the Android OS that provide the foundation, functions and space for your app to live and interact with. Now that we’ve got that out of the way, let’s move on to the building blocks of an Android app.

The building blocks of an Android App

There are five main components that make up an Android app:

  1. Activities
  2. Intents
  3. Services
  4. Broadcast receivers
  5. Content providers

Activities

Activities are how your users interact with your app. When a developer speaks about an activity in Android, they are usually referring to the multiple points of interaction on a single screen through the app’s UI (single screens in Android are referred to as view models, and they dictate the “box” that visual information fits into). Take, for instance, a device’s native phone app – there are separate activities to dial a number, view recent and missed calls, and voicemail. All of these activities are separate from each other, and are considered distinct activities unto themselves – but they all work together as a whole to help the user achieve their goal.

Activities in Android are designed to keep track of what the user is currently doing, the processes that keep track of the features users are engaging with, and “killing” the processes that are no longer necessary for the user at the moment.

When an activity is killed, its current state is saved, in case the user comes back to that activity. This ensures that memory is both freed up for current processes, but the processes in the background remain quickly accessible to the user.

Within activities are fragments, which can be thought of as sub-activities. Fragments can be interacted with just like an activity, but they are specialized – they give your app’s UI the ability to adapt to different device screen sizes, as well as the ability to produce a more dynamic layout. If you know HTML, it’s basically the same idea as building a responsive website.

Intents

Intents function as the messengers between the components that make apps work. They are used to take the necessary information from one component of an app to the next, in order for that component to do it’s job.

If that was a little confusing (which it is, I don’t blame you), think of them as an alarm clock. An alarm clock wakes you up and tells you what the current time is – the information you need in order to start acting to get out of bed and get on with your day. Intents “wake up” app components, and let them know it’s time to get out of bed.

The most important part of intents is making sure your code uses clear naming conventions – an intent needs to match with the names of components it needs to interact with, and if the names don’t match, it won’t be able to find the component it needs to deliver the message to.

For an example of naming conventions, let’s pretend there’s a turtle. The turtle sees a coyote. An intent is sent from TURTLE_CRAWL to TURTLE_HIDE. This changes the action the turtle is taking, just as an intent will change what action the app is taking in order to properly interact with the user.

There are two types of intents: implicit and explicit. Implicit intents are used to send information from one component of one app to another component of a separate app. Explicit intents are the direct opposite – and are used to take information from one component of an app and use it to invoke another component of that same app.

Services

Services are what keep the functions of apps running in the background, and are broken down into two categories: started services and bound services. A started service, for example, is used to run some sort of function in the background, until the user stops the function; this would be used to allow a user to listen to music from one app, while engaging another app at the same time.

A bound service is kind of like one app giving another app a helping hand – these basically tell the system to not kill the function the two apps are sharing, and as soon as the function has been completed, it can be killed.

Broadcast receivers

Broadcast receivers are aptly named, and serve as the proverbial loudspeaker for a device. Probably the most well-known (and dreaded) broadcast receiver is the “low battery” notification.

When a user downloads an app onto an Android device, the OS will assign that app a unique Linux user ID (Android’s foundation is a Linux kernel), and all apps run on a virtual machine (a simulated computer that exists as its own entity on the OS), so each app runs in an isolated environment from all other apps on the device.

This is called the principle of least privilege. This means that each app can only access the functionalities and data it needs to complete a task, and nothing more. This provides an extra layer of security, as apps are unable to share data with each other, and can only access the systems they need to work.

Broadcast receivers usually function with the help of the previously-mentioned intents.

Content providers

Just as the Android OS has libraries that help it function, so to does an individual app. The libraries, named content providers, house the information of that app, so other apps can access that information in order to function properly.

Think about how when someone texts you an address, you can click on that address to open it in Google Maps. In order for your map to display the address that was texted to you, your text messenger app stores that information in a content provider, which Google Maps can then access and display.

The manifest file

After you’ve made your app, all of the components of your app (activities, intents, services, broadcast receivers, and content providers) must be stored in what’s called the manifest file. The manifest file is the folder the Android OS searches through in order to find the components that make your app run. In short, for a device to know that an app component exists, that component must be stored in the manifest file.

Think of it as the roadmap the system uses to run an app – it tells the OS where to go and what to interact with. It also identifies permissions the user has set within the device, declares the hardware features an app needs to run, and the APIs it needs to be hooked up to.

Where to go from here?

The next steps to take are beta testing and then publishing, which comes with its own costs (a one time fee of $25 for Google Play) in addition to the other costs that can be expected while developing a mobile app.

We hope you’ve found this guide to Android development helpful! Below, you’ll find a glossary of commonly used words regarding app development.

Glossary of developer jargon:

  • Adaptive interface: An app that adapts to the available screen resolution. Essentially the same idea as a responsive web page.
  • API: An Application Programming Interface is a set of functions, classes, and protocols that define how pieces of software interact with each other. They facilitate code creation by providing tools and building blocks that help companies connect their software with another set of software, or even other companies’ code.
  • API calls: Sometimes referred to as an API request, an API call is essentially a piece of software in an app connecting to a server, and requesting a data transfer.
  • Back end development: This forms the logic and data structure of the app.
  • Back end integration: This allows an enterprise system to connect to an app – for example, connecting the database of a website to an app, in order for users to access the database through the app rather than the website. The information is hosted on the website’s server, but is still accessible through the app itself.
  • Front end: This is the layer of the app that users interact with.
  • Iterate: To perform a certain task or function repeatedly.
  • On demand app: These are apps that allow users to find, connect with, and book a professional service.
  • SDK: A Software Development Kit is a pre-made software tool that can be used for a variety of functions. Some SDKs help with analytics, others provide debugging and maintenance utilities, and a whole host of other functions.
  • Tokens: A token is a software based security tag that produces a single-use login password or PIN.
  • UI/UX: User Interface and User Experience are intrinsically tied to each other. UI is the layout and design of the front end of an app. UX is how the app flows, functions, and responds to the user’s inputs.

App development pitfalls

When you’re building an app, it’s much more important to know what not to do than it is to follow a step-by-step checklist that lays out the path to success.

There’s a good reason for this – every app’s path to success is different, and something that’s right for one app could be completely wrong for another. The number one rule to successful branding is to differentiate yourself, and apps are no different. If you’re doing the exact same thing as a competing app, there’s no reason for users to try out your own.

That’s why this blog isn’t going to focus on what to do, but rather what not to do when developing your app.

Development pitfalls

Here’s what you shouldn’t do when building your app:

Make on-boarding difficult

When a user opens up your app for the first time, you want to make a good impression. The home screen of your app should instantly display the value of the app to the user – this can be achieved through obvious symbology in your navigation bar, or a quick, quippy, and enticing sentence that sums up what the app does.

Always make on-boarding achievable in the least possible amount of steps – you want users interacting with your app’s actual features, not spending time setting up accounts. Speaking of accounts…

No alternate options for logging in

If your app requires users to sign in, give them multiple options to do so. Some users will prefer to sign in through a social account, as it’s usually quicker than setting up a native account through the app.

Other users, however, prefer to set up a native account through your app, for many different reasons – some of those being security-minded users that don’t want your app to access their social data, or users who don’t have social media accounts.

Those who sign in with social media and those who don’t are both significant groups, so you want to make sure everyone has access to the option they prefer. Also, make sure you have enough social media options to link to.

Asking for payment info too soon

If your app requires access to a bank account, credit card, or online payment service like Stripe, don’t ask your users to input that info immediately after opening your app. Only request this info right before a payment must be processed. If you give users a chance to navigate through your app and figure out its value and the services it offers before asking for personal payment information, they’re much more likely to stick with your app.

For more info about asking for payment info and the effects it has on user retention, check out our blog on the topic.

Not conducting market research

Remember: just because you like your idea, it doesn’t mean everyone else will. Just like any product, apps must be based on market research – if there’s no one interested in your app, there’s no market to grow into.

More specifically about market research…

Not finding a niche

Like we stated above, the number one rule to branding is to differentiate, and it’s no different for apps. To quote Marty Neumeier’s Brand Gap, “when they zig, you zag.”

Conducting market research to determine what type of app people would be interested in isn’t enough – plenty of people are interested in ridesharing – but there’s already plenty of apps that have saturated this market. Think about how Spotify differentiated itself from Pandora – it’s a music streaming service, but while Pandora brings the music to you based on one band, with Spotify, (at least originally) you find the music you want to listen to.

These differences in design appeal to different audiences, which is exactly what you want to do. Lyft didn’t try to take away satisfied Uber customers, they researched the segments of users that were dissatisfied with Uber’s service, and then found out what they wanted. Then they did that.

Find a niche, and cater your app to their needs and wants.

Copying competition

As Nick Jones, NS804 CEO says, “Do your one thing and do it well.”

While it’s extremely important to keep track of what your competition is up to and how they’re doing it, it’s so you can take what works and then mold it to your own brand. If you’re outright copying, users will notice, and they’ll ask themselves “why don’t I just use the original app?”

Know what your competition is doing so you can capitalize on their good ideas and then head in your own direction. Stick to your tribe.

Trying to accomplish everything

To reiterate the point from above – it’s always better to do one thing well than it is to do multiple things mediocrely. Find your niche’s pain point, and then focus on solving that, and nothing else. Figure out ways to streamline the solution you provide. Every feature your app utilizes should in some way provide a benefit to solving your niche’s pain point.

By allowing your app’s scope to creep past your original idea, you can spell the doom of your business – for each feature you add, you add to both your time and cost invested into your app. When first starting out, provide the minimum amount possible to truly solve your niche’s pain point, and nothing else. Once your app is gaining traction, then you can go back to the drawing board and figure out what to add (but make sure the features you add still revolve around the main purpose of your app.)

For more tips on avoiding scope creep, check out our blog on the topic.

Not considering the use case

It’s easy to say “I want to make an app that helps connect people,” but what’s difficult to imagine is the way they will actually use it. When you have a vision or a brainchild, it’s not only difficult to throughly communicate your idea to other people, it’s also challenging for them to use it exactly the way you imagined they would. Everyone’s a little different, and because of this, use things in different ways.

There’s a few things you can ask yourself to help figure out what your app’s use case will be:

  1. When will the user open the app?
  2. Where will the user be when engaging with the app?
  3. What solution will they expect?
  4. How much time will it take to complete a session in the app?
  5. What problems will they run into while using the app?
  6. What corners will they try to cut while engaging with the app?

The more specific and narrow you can get with these questions, the better. Figuring out the answers to these questions can be achieved by through testing.

Multi-platform launch

If you’re making a hybrid or progressive web app (which we don’t recommend), this won’t really matter – but if you’re investing the time and money into native development (which is the more substantial option for long-term app growth), it’s much better to focus on one platform. This is for a few reasons:

  1. Android and iOS apps are built using different coding languages
  2. Each platform requires its own dev team, as well as its own round of beta testing
  3. For every platform you release your app on, you increase your post-launch costs
  4. Each native app requires significant time to build

Choose one platform to focus on in the beginning – once you have a substantial user base, and have a steady stream of income, then think about venturing to the other platform.

Not considering different markets on different platforms

This is another reason natively-developed apps are better than hybrid – Android and iOS users expect and interact with apps in different ways. From style guides to user culture, Android and iOS apps are very different in their methodology and feel. The market research findings you make about iOS users will most likely be different than the insights you make when speaking with Android users – even when your app ultimately functions the same on both.

If you’re having trouble figuring out what platform would be best for your app to launch on, check out our blog about deciding which is best for you.

Insufficient beta testing

While testing adds more time and cost to your initial development cycle, it ultimately saves you time, money, and headaches in the long run. Testing should be conducted continuously throughout your development cycle – test your app after every new build and iteration.

Users are fickle and will abandon an app for almost any reason – you don’t want to end up dealing with low user retention because you skipped this important step.

For more information about conducting beta testing on your app, check out our blog about it.

Ignoring A/B testing

Yup, there’s more testing you should be doing! If you’re unfamiliar with what A/B testing means, it refers to switching out one piece of data with another to see how it performs with users. For example, what happens if you switch the color of interactive buttons from blue to green? What if you switch the icon of your app in the app store to a different one?

To successfully conduct a round of A/B testing, you need to have a firm grasp of your analytics both before and after the change – then compare the two values to figure out which version is more effective.

Speaking of…

Not checking analytics

There’s nothing glamorous about analyzing data, but if you’re not, it’s like driving a car, down a mountain, with no brakes all while blindfolded.

That might seem like a bit of a hyperbole, but analytics is more than your conversion rate – platforms like Kumulos provide information about errors and crashing, what types of devices and platforms users are accessing your app from, what time of day they’re engaging with your app, and even what country or state they live in.

Knowing how your app is functioning among it’s niche is crucial and necessary to its continued growth and retention.

Putting user acquisition over user retention

It’s easy to get excited over your download rate – after all, if users aren’t downloading your app, how will they interact with it? While acquisition is incredibly important, retention is even more so. It’s the same rule as in sales: it’s always cheaper to retain a client than it is to find a new one.

Your efforts should always focus on keeping your returning users happy – if they’re happy, they’ll provide your app with positive reviews and scores, which will boost its rank on the app store, which in turn will lead to a higher conversion rate. Remember – word of mouth is the most powerful and effective marketing tool.

When you make your current users happy, they’ll do your marketing for you.

Not interacting/engaging/updating

There’s nothing creepier than a ghost town, and your users will notice if your app becomes one. Regularly update your app – this shows your users that you care about their experience with you app, and it also serves as a reminder that your app exists, and there’s something new to check out.

If a user leaves a review, respond. People like being heard. Use push notifications and proximity marketing to add different channels of user engagement to your app’s repertoire.

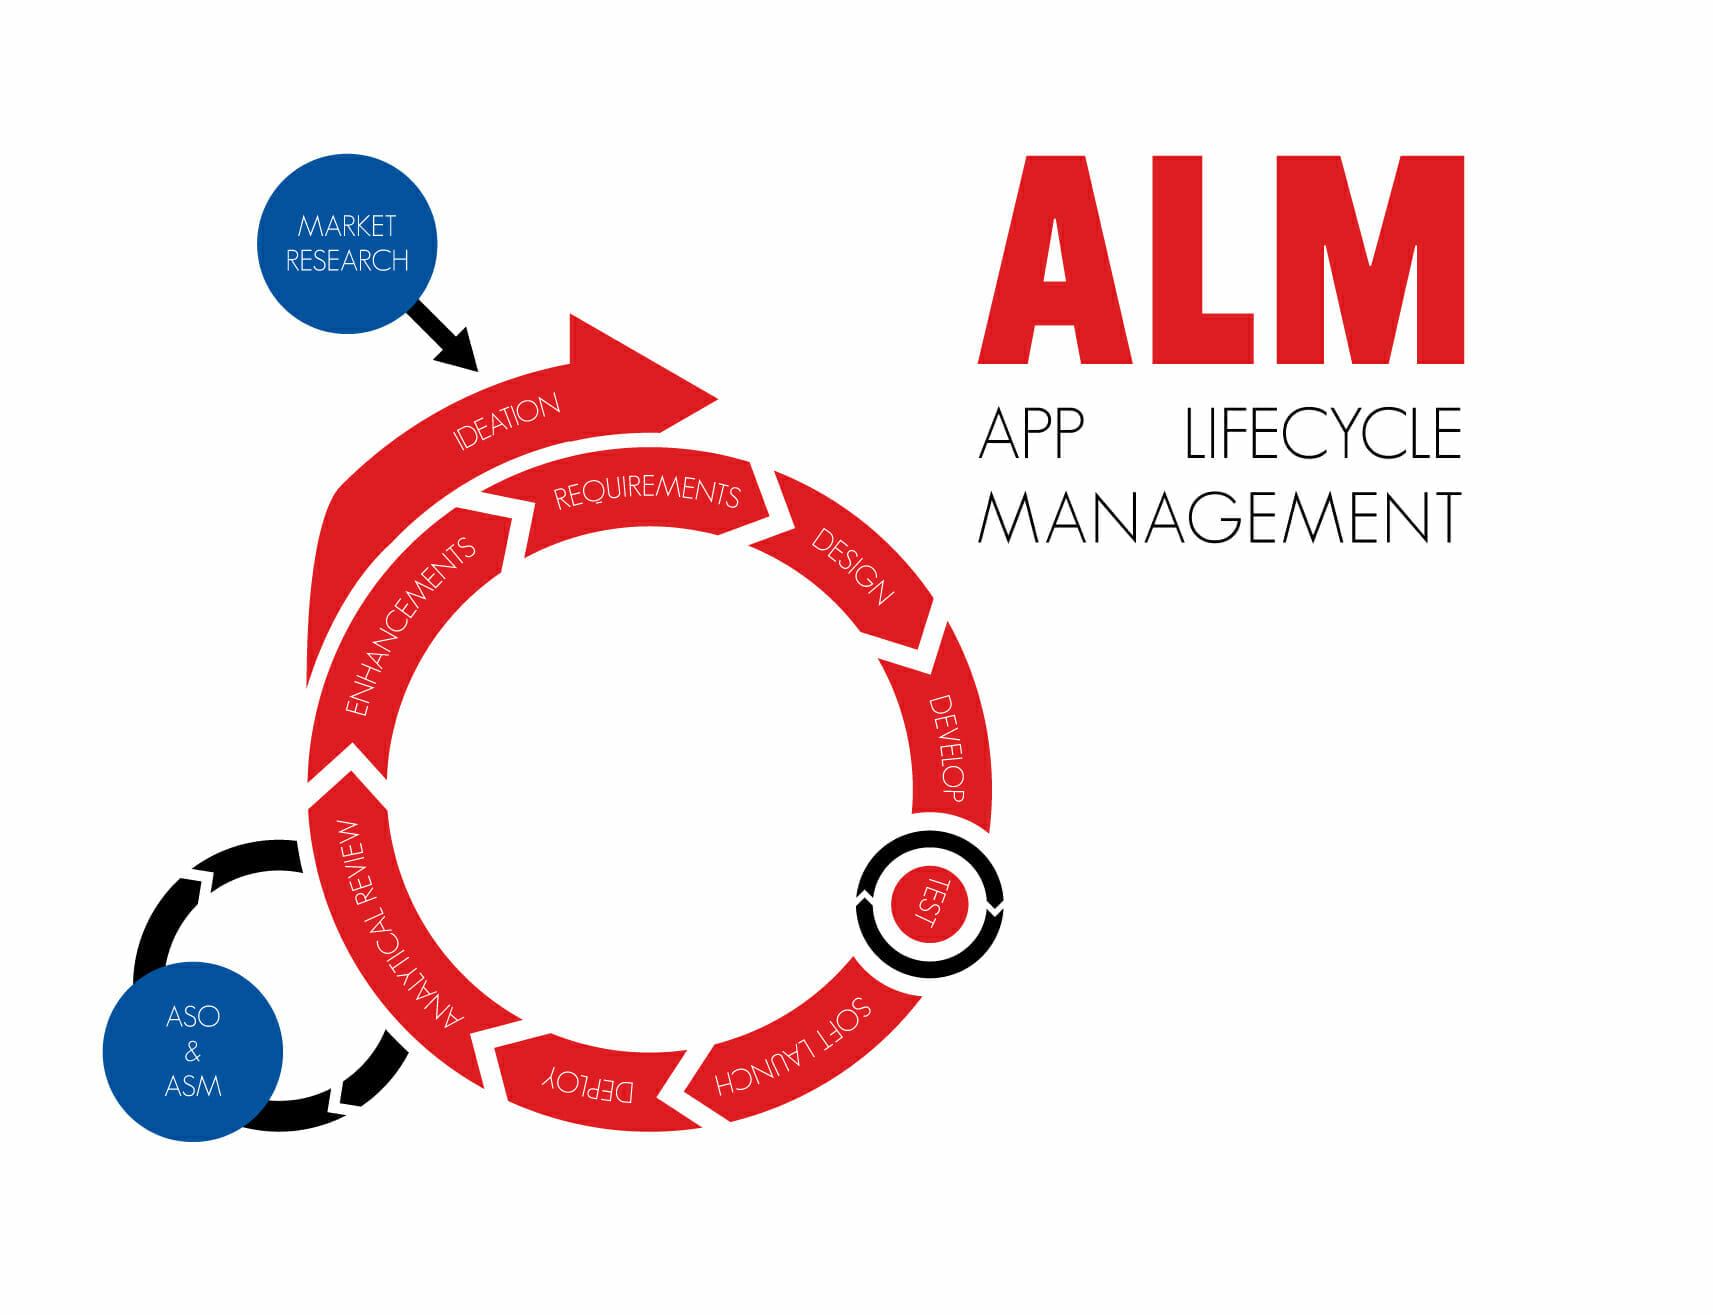
No post development plan

App lifecycle management is crucial to your app’s growth and success. To properly manage your app’s lifecycle, you need to focus on:

  • Keeping track of your competition
  • Providing major updates to UI and security
  • Offering additional solutions through your app
  • Adapting to current trends

When it comes to anything that works on code, development is never truly over. For your app to stay relevant, you need to show your users you’re ready to adapt to our ever-changing world. Those who stay still get left behind.

Expecting immediate ROI

Your app won’t immediately start making money after it’s published to the app store. Plan in advance for this – the first phase after launch is implementing your ASO campaign. It’s when users are engaging with your app that you’ll begin to see a profit, and no earlier.

Not considering hidden costs

Remember – publishing to the App Store and Google Play requires a publisher’s fee. The App Store’s fee recurs annually, and Google Play’s is a one time deal.

Hosting the backend of your app will have recurring costs (usually monthly) and your analytics platform will also be a recurring cost (usually monthly as well).

For more information about the hidden costs of developing an app, check out our blog on the topic.

Follow your own path

We hope you’ve found this list of what not to be helpful. But always remember one thing – if it works for your app, it works. Don’t worry about fitting the mold – be different, and be daring.

How to build a mobile app: App design

What makes a well-designed app? Is it the colors? The layout? The icons? The flow?

It’s simultaneously none and all of these things combined – and a whole lot more. In this addition to How to Build a Mobile App: The Ultimate Guide, we’re going to go through – step-by-step – how to properly design an app from the ground up.

Step 1: Find the problem

This might be the hundredth time we’ve stated it in our blog, but knowing your users’ pain point will drive every facet of your app’s development – from the logic in the backend to your color scheme and logo.

This is the most important step to take, as it will dictate everything your app does. When searching for a pain point, ask yourself the following questions:

  • Is this problem specific to my niche?
  • What solution does my niche expect?
  • What steps do they need to take in order to solve the problem?
  • Where does my app fit in those steps?

For example, let’s pretend you want to make an app for gardeners. Great! Now, what niche of gardeners are you attempting to connect with? Gardeners is much too broad of an audience. What about community gardens? Those are pretty big right now. Still too broad. Okay, how about community garden managers? Now there’s an idea.

What kinds of problems do community garden managers face? Are community gardens often managed by one individual, or a team? Is that team made of employees or volunteers?

Narrow your scope as much as you can, and know as much as you can about your audience. Go to a community garden. Get your hands dirty. Figure out what it’s all about, and put yourself in the shoes of a community garden manager. Then, figure out how to make their life easier.

Step 2: Know the problem – and the steps to solve it

Let’s continue to pretend you’re making an app for community garden managers, and the problem you’re planning to solve isn’t (after your extensive research) necessarily gardening related, but rather gardening adjacent. You found that two big issues community food gardens strive to solve are food waste and food deserts – community gardens tend to reach out to, well, the community, in an effort to get them eating healthier, fresher, and more local produce.

The community garden you’ve reached out to specifically wants to have a system put in place that keeps track of their food production, and how much of the food produced is wasted – but their group of volunteers doesn’t have the time to reach out to fifteen, thirty, or one hundred people every week.

So, your plan is to make an app that gives the community garden manager the tools they need to keep track of food production and food waste. But how do you go about doing that?

They have a limited budget, and since they’re volunteers, limited time. Because of this, they need a system that gives them the necessary data to effectively run the garden in the shortest amount of time possible. This is also a two step process – the community garden manager needs to know what’s happening in their garden, as well as what’s happening at their members’ dining room tables.

Your app needs to allow the community manager to collect data from remote locations – the community garden members’ kitchens, as well as the garden itself. So, you now know this app will be designed with two types of users in mind:

  1. The community manager keeping track of the different plots in the garden
  2. and the members who self report on their food consumption

Notice that both of these categories of users are organized by the role they play in solving the main paint point – secondary pain points are solved (like how to share and analyze data remotely) in the process of solving the main pain point – giving the manager the tools they need to adapt with members’ tastes, and grow more food that will actually be eaten.

Everyone’s brains work differently, so we won’t tell you to specifically sketch out your ideas, make wireframes, or write a list of steps users would take. Do whatever works for you – but it’s necessary for you to know the expected steps the people using your app will take. These are called your use case scenarios, or user stories.

So let’s map out the main use case scenario for this app. From now on, for brevity’s sake, we’ll call this app “Growr”:

  1. The community garden manager adds in the current produce to a selectable list on Growr
  2. A community garden member selects the types (and amounts) of produce they brought home from the garden from that list
  3. The member then reports on the types and amounts of produce they actually ate
  4. The data is sent to the community garden manager, who then uses that data to optimize the amounts and types of food grown in the garden

Step 3 – Build your brand

Whether you’re doing it DIY or by partnering with a dev shop, this is the time to figure out what your app is going to look like. By this point, you know the audience you’re trying to connect with, the problem they face, and the steps your app will take to help them solve that problem.

An app’s brand is determined by your audience, and measured by how well it solves their problem – not by its icon in the App Store. But, it doesn’t hurt to make your solution look pretty. This is where you’ll figure out Growr’s color palette, fonts, logo, and icons.

After you’ve created these individual elements that comprise your visual brand, and with a map of your use case scenarios, you can start to layout your app. This is a step in the process where we will advise the use of wireframes – this is to help you get a feel for the flow of your app, and save both time and money.

The next step is to add in all the individual elements you made previously (like the logo, and button styles), and fill in the wireframe layouts with final versions. When that’s done, it’s time to move on to the prototyping phase.

Step 4 – Make it work

You don’t need to know Swift or JAVA – there are plenty of prototyping apps available to use. Before we begin coding, our lead designer will create a prototype of the app in InVision, and we’ll all sit down in our conference room to test the build against the pain point. We get the whole company together for these meetings – the more eyes on your prototype the better.

Doing this will allow you to iron out any bumps in your app’s flow, UX, and design all before writing a single line of code. It will also give you an idea of what your app will really look like when it’s complete – it’s the difference between looking at a photo and watching a video – prototyping your app, while adding another step into the design process, will always give you more information that screenshots of your app’s layout.

After this, your design phase is complete! It’s on to coding for you!

Some other prototyping tools you can use:

Platforms, themes, and user expectations

Major decisions about your app’s design will be made by which platform you build your app for – either Android or iOS. Both have different style guidelines, as well as over-arching layout themes. Android and iOS users expect the same functionality to be interacted with in very different ways; Android users, for instance, will look for a “hamburger” style navigation menu, while iOS users will look for a bottom navigation bar.

Android design principles

Create. Unify. Customize. These are the ideals of Android, and specifically, Material design. Material design focuses on typography, grids, space, scale, color, and imagery, and a meaningful, focused hierarchy that immerses users in the UX of the app.

Click here for the full list of Android core design principles.

iOS design principles

Clarity. Deference. Depth. These are the themes that separate iOS from other platforms. Some other words that pop up a lot in Apple’s iOS design guide are understand, familiar, subtle, and functionality. iOS guidelines dictate apps with an esthetic that fits the brand of the app, consistency of theme with iOS as a whole, and fluid manipulation and feedback.

Click here for the iOS style guide.

General app design principles

Whether it’s print, web, or mobile, good design is more than making something look pretty – design is understanding both the project and the problem – and knowing how to present that information in a pleasing way.

An important thing to keep in mind when designing your app is that any interaction should provide a user with some sort of feedback. Think of the difference between a website that features scrolling parallax versus one that doesn’t. Which one feels like the better, more responsive UX?

Smartphones are much more intimate than a desktop – they spend most of their time right next to us – and because of this, we expect our inputs when using them to have a sort of visual conversation with us.

You want your app to feel like it belongs on the users device, and for iOS and Android users, this will mean different things. While Android apps tend to be more customized than iOS apps, both feature libraries of visual elements available to all UI/UX designers. Don’t be afraid to use these – in fact, Apple encourages it. Your app should feel as native to the user as their native texting app.

This is why we believe native development is always the best choice in the long run – even if that means increasing the time and money spent in the development stage. While building multiple apps for different platforms can be more expensive in the beginning, having two native apps that perform better with users than a single hybrid app is a more sustainable and scalable business model. For more reasons why we believe native is the better choice, visit our blog on the topic.

Another thing to consider is not only the hierarchal flow of your app, but the visual flow as well. For example, when an iOS user sees a screen come in from the bottom of their device (known as a presentation), they intuitively expect a step that must be completed before moving back to the previous screen. If a screen comes in from the side (known as a push), they intuitively know they’ve moved on to the next step.

It’s choices like this that may be small on their own, but the summation of their parts as a whole create a consistent visual language and flow throughout your app – which is one of the main hallmarks of good design.

Nitpick the details

Details matter – an app should never have to come with a set of instructions in order for a user to know how to properly interact with it. It’s the small details that will provide your users with the hints and visual cues they need to navigate your app.

Subtly is key to mobile app design. Something as simple as a highlighted or muted color can imply a button’s functionality – if a button is a bright color, your users will expect it to accomplish something. If a button is a muted color, like grey, they will intuitively expect it to perform an action analog to a canceling function.

There’s a balance to these fine details, however. Keep your design as simple as possible – if the people you present your prototype to can’t figure out how to navigate your app in a few minutes (or ideally, 30 seconds), it’s time to go back to the drawing board and figure out how you can simplify things.

Understand the problem

That’s the most important part of mobile app design. It doesn’t matter if you’re not a designer yourself – knowing what your app needs to accomplish will dictate everything about it. It’s a quote I’ve used before, but I feel Frank Lloyd Wright’s words fit perfectly in reference to mobile design:

Form follows function – that has been misunderstood. Form and function should be one, joined in a spiritual union.